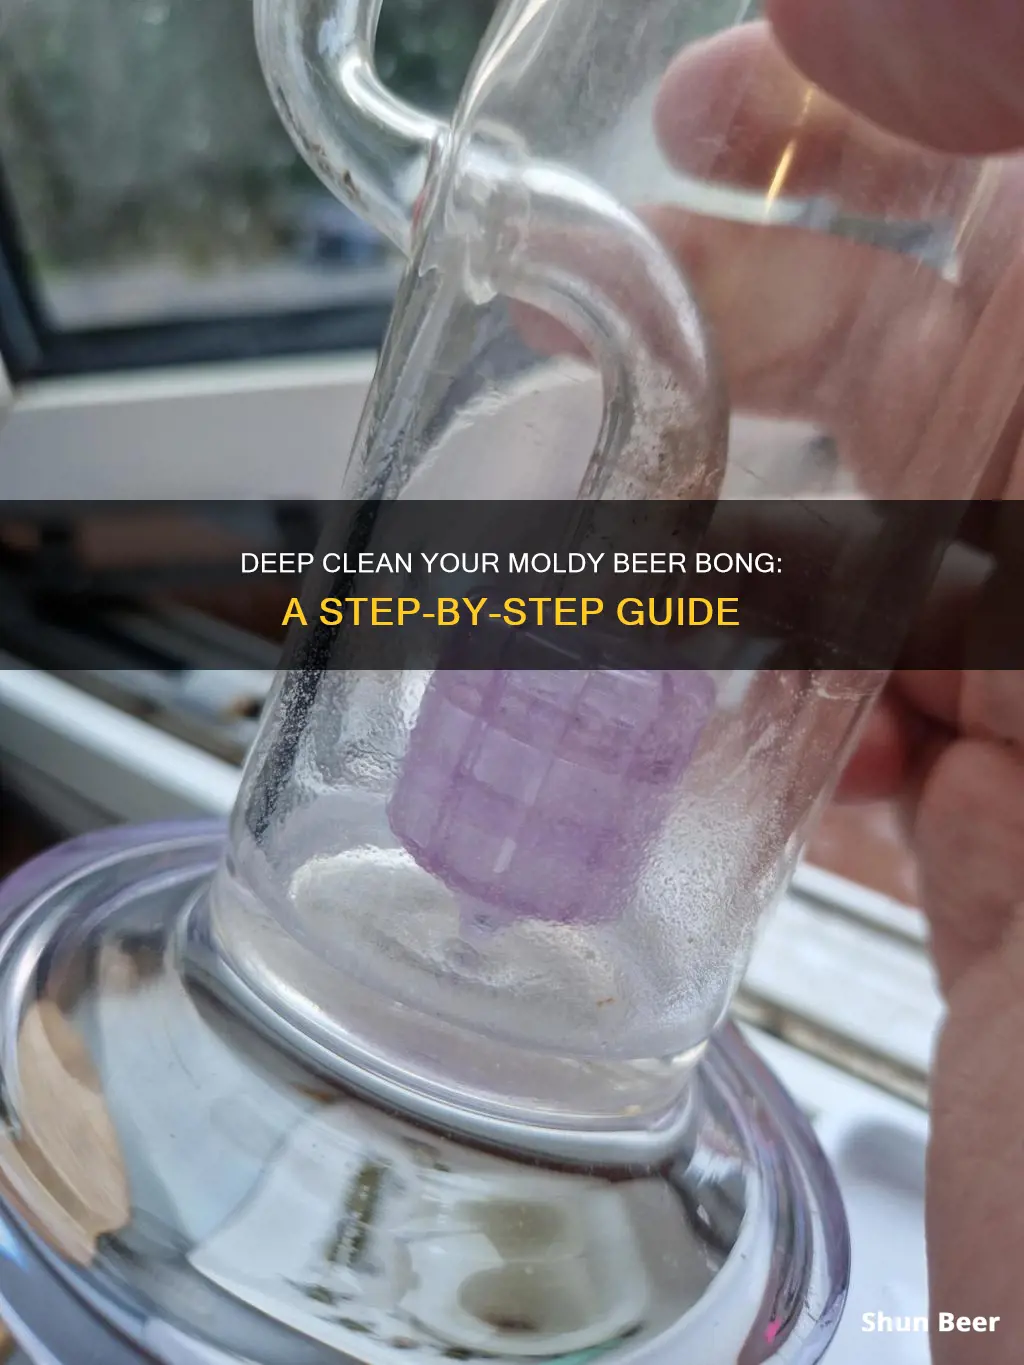
Cleaning a mold beer bong can be a challenging task, but with the right techniques, you can effectively remove the mold and restore your bong to its original state. This guide will provide step-by-step instructions on how to clean a mold beer bong, ensuring a thorough and safe process. From preparing the necessary supplies to using effective cleaning solutions, you'll learn how to tackle mold and maintain a clean and healthy bong.
What You'll Learn
- Prepare the Tools: Gather cleaning supplies: dish soap, white vinegar, and a brush
- Disassemble the Bong: Carefully take apart the bong into its components
- Soak and Scrub: Immerse parts in vinegar solution, then scrub with a brush
- Rinse Thoroughly: Rinse all parts with hot water to remove residue
- Dry and Reassemble: Allow to air dry, then reassemble and use
![]()
Prepare the Tools: Gather cleaning supplies: dish soap, white vinegar, and a brush
To effectively clean a moldy beer bong, it's crucial to have the right tools and supplies. Here's a step-by-step guide on preparing your cleaning arsenal:
Gather Your Cleaning Supplies:
- Dish Soap: Opt for a mild, biodegradable dish soap. This will help break down the grease, grime, and mold without being too harsh on your bong. Avoid using harsh chemicals like bleach, as they can damage the bong's material.
- White Vinegar: Vinegar is a natural disinfectant and deodorizer. It's effective at killing mold spores and eliminating odors.
- Brush: A small, soft-bristled brush is ideal for reaching into tight spaces and removing stubborn buildup. Make sure it's not too abrasive to avoid scratching the bong's surface.
- Dish Soap: Cuts through grease and grime, making it easier to remove mold.
- White Vinegar: Provides a natural, non-toxic cleaning power and helps eliminate mold and odors.
- Brush: Allows for precise cleaning in tight spots, ensuring a thorough clean.
Additional Tips:
- Consider using a rubber glove to protect your hands while cleaning.
- For particularly stubborn mold, you can soak the bong in a mixture of equal parts vinegar and water for 15-20 minutes before scrubbing.
- After cleaning, rinse the bong thoroughly with warm water to remove any residue.
By gathering these simple yet effective tools, you'll be well-prepared to tackle the mold in your beer bong and restore it to its original shine.
Unlocking Flavor: Why Cool Beer to Room Temp Before Fermentation
You may want to see also
![]()
Disassemble the Bong: Carefully take apart the bong into its components
Disassembling a bong is a crucial step in the cleaning process, especially when dealing with mold and mildew. This process allows you to reach all the nooks and crannies, ensuring a thorough clean. Here's a step-by-step guide to help you disassemble your bong effectively:
Step 1: Safety First
Before you begin, ensure you are in a well-ventilated area and wear gloves to protect your hands. Mold and mildew can be harmful, so taking precautions is essential.
Step 2: Remove the Bowl and Downstem
Start by carefully lifting the bowl (the piece at the top) and detaching it from the downstem (the cylindrical part connecting the bowl to the base). This step is crucial as it provides access to the inner parts of the bong, including the inner chamber and the percolator.
Step 3: Take Apart the Base
Gently pull the base (the bottom part) away from the downstem. This component often has a rubber gasket or O-ring that seals the bong. Carefully remove this gasket and set it aside, as it may need replacement after cleaning.
Step 4: Disassemble the Downstem
Now, focus on the downstem. Use a small screwdriver or a specialized bong tool to carefully pry the downstem apart at its base. This will reveal the inner tube, which is often made of glass or a durable plastic. Be gentle to avoid breaking the pieces.
Step 5: Clean Each Component
Rinse all the disassembled parts with warm, soapy water. For the inner tube, you might want to use a brush to scrub away any stubborn mold or residue. For the bowl and downstem, a simple rinse should suffice. Ensure no soap residue remains, as it can affect the taste of your next brew.
Step 6: Dry and Reassemble
After cleaning, allow all the parts to air dry completely. Once dry, carefully reassemble the bong, ensuring all components are securely in place.
Disassembling the bong is an essential step to ensure a thorough clean, especially when dealing with mold. By following these steps, you can effectively remove mold and mildew, restoring your bong to its original glory. Remember, regular maintenance and cleaning will help prevent future mold issues.
Mastering the Art of Cleaning Your Beer Tap: A Boise Guide
You may want to see also
![]()
Soak and Scrub: Immerse parts in vinegar solution, then scrub with a brush
To effectively clean a moldy beer bong, the soak and scrub method is a reliable and natural approach. Here's a step-by-step guide to ensure a thorough cleaning:
Soaking the Bong: Begin by filling the bong with a mixture of equal parts white vinegar and warm water. The vinegar's acidic nature is key to breaking down the mold and grime. Ensure the entire interior of the bong is submerged, including the downstem and bowl. Let it soak for approximately 30 minutes to an hour. This initial soak will help loosen and dissolve the mold, making it easier to remove.
Preparing the Brush: While the bong is soaking, gather your cleaning tools. You'll need a stiff-bristled brush, preferably one designed for cleaning glassware, to ensure effective scrubbing without scratching the surface. If you have a specialized bong brush, this is the ideal tool. Alternatively, a regular toothbrush can be used, especially for the smaller crevices and tight spots.
Scrubbing Technique: After the soaking period, carefully remove the bong from the vinegar solution. Rinse it briefly with warm water to remove any loose mold fragments. Then, apply the scrubbing technique. Start by gently brushing the interior surface of the bong, paying close attention to the areas where mold is most prevalent. Use circular motions and ensure you cover all surfaces, including the base and the rim. For stubborn mold, you might need to apply more pressure, but be cautious not to damage the glass.
Final Rinse: Once you've scrubbed the entire bong, rinse it thoroughly with hot water to eliminate any remaining vinegar and mold residue. Make sure to rinse multiple times to ensure no vinegar taste remains. Finally, allow the bong to air dry completely before reassembling and using it again. This method is not only effective for mold removal but also helps to prevent future mold growth by ensuring a clean and dry environment.
Lager's Color: Brown or Golden?
You may want to see also
![]()
Rinse Thoroughly: Rinse all parts with hot water to remove residue
When it comes to cleaning a moldy beer bong, one of the most crucial steps is to ensure that you rinse all parts thoroughly with hot water. This process is essential to remove any remaining residue and prevent further mold growth. Here's a detailed guide on how to do it effectively:
Start by disassembling the bong into its individual components. This includes the bowl, downstem, water chamber, and any other removable parts. Hot water is your best friend in this process. Fill a sink or a large container with enough hot water to submerge the entire bong. The heat is key to dissolving and removing any stubborn residue. Immerse the bong and its parts into the hot water, ensuring that every inch is covered. Let the water sit for a few minutes to allow it to work its magic.
During this time, the hot water will help to break down the mold and any built-up grime. For particularly stubborn areas, you can use a soft-bristled toothbrush or a bottle brush to gently scrub the surfaces. Focus on the areas where mold is most likely to accumulate, such as the bowl and the inner walls of the water chamber. Be gentle to avoid damaging the bong's material.
After a few minutes, remove the bong from the hot water and rinse each part thoroughly. Hold the parts under running hot water, ensuring that all the nooks and crannies are cleaned. The heat of the water will help to flush out any remaining mold spores and residue. For an extra thorough clean, you can use a mild dish soap mixed with hot water. Dip a soft cloth or sponge into the soapy water and wipe down each part, paying extra attention to the areas where mold was present.
Finally, rinse the bong and its parts again with hot water to remove any soap residue. This step is important to ensure that no soap remains, as it can leave a soapy taste in your beer. Once you've rinsed everything, dry the parts with a clean towel and reassemble the bong. With these thorough rinsing techniques, you'll effectively eliminate mold and ensure a fresh, clean drinking experience.
The Mystery of the Crisper: Who's Hiding Veggies in My Beer?
You may want to see also
![]()
Dry and Reassemble: Allow to air dry, then reassemble and use
To effectively clean a moldy beer bong, the process of drying and reassembling is crucial. Here's a step-by-step guide to ensure a thorough and safe cleaning:
Drying the Bong: After removing the mold, it's essential to dry the bong thoroughly. Start by disassembling the bong into its individual parts: the bowl, downstem, base, and any other removable components. Rinse each part with warm water to remove any loose mold fragments and debris. Use a soft brush or a bottle brush to gently scrub the inner surfaces, ensuring you reach all the nooks and crannies. Once rinsed, place all the parts on a clean, dry towel or a drying rack. Allow each piece to air dry completely; this might take several hours or even overnight, depending on the size and shape of the bong. Ensure there's good ventilation in the area to promote faster drying.
Reassembling the Bong: Before reassembling, inspect each part to ensure no mold spores remain. If you notice any remaining mold, repeat the cleaning process until it's completely removed. Once all parts are dry, carefully reassemble the bong, ensuring each piece fits snugly. Pay close attention to the downstem and bowl, as these are critical for the bong's functionality. Tighten all connections securely but gently to avoid damaging the glass.
Final Steps: After reassembly, fill the bong with hot water and let it sit for a few minutes. This will help loosen any remaining residue. Then, drain the water and rinse the bong with a mild detergent or dish soap to ensure a fresh start. Finally, fill the bong with water and use it as usual. This process ensures that the bong is not only clean but also ready for use, free from any lingering mold or residue. Remember, proper drying and reassembly are vital to maintaining a clean and functional beer bong.
Fermentation Duality: Unlocking Flavor Secrets with Two Containers
You may want to see also
Frequently asked questions
Cleaning a moldy beer bong requires a thorough process to ensure all residue and mold are removed. Start by disassembling the bong into its individual parts: the downstem, bowl, and base. Rinse each part with hot water to remove loose debris. Then, use a mixture of white vinegar and warm water (1:1 ratio) to soak the parts for at least 30 minutes. This will help dissolve the mold and grime. After soaking, scrub each part with a brush to remove any remaining residue. Rinse thoroughly with hot water to eliminate the vinegar smell. Finally, allow all parts to air dry completely before reassembling.
While it's possible to use a dishwasher, it's generally not recommended for beer bongs due to the risk of damage. The high heat and pressure in a dishwasher can cause the glass to crack or warp. Instead, opt for a manual cleaning method using hot water and vinegar as suggested above. This ensures a safe and effective clean without the risk of damage.
Mold in a beer bong can be caused by a variety of factors, including improper cleaning, leaving the bong uncleaned for extended periods, and the presence of organic matter like beer residue, food particles, or even dead skin cells. Moisture and warmth create an ideal environment for mold to grow. Regular cleaning and maintenance are crucial to prevent mold buildup.
It is recommended to clean your beer bong after every use to maintain hygiene and prevent the buildup of mold and bacteria. Regular cleaning ensures a fresh and clean drinking experience. If you notice any residue or a musty smell, it's a sign that the bong needs immediate attention and cleaning.