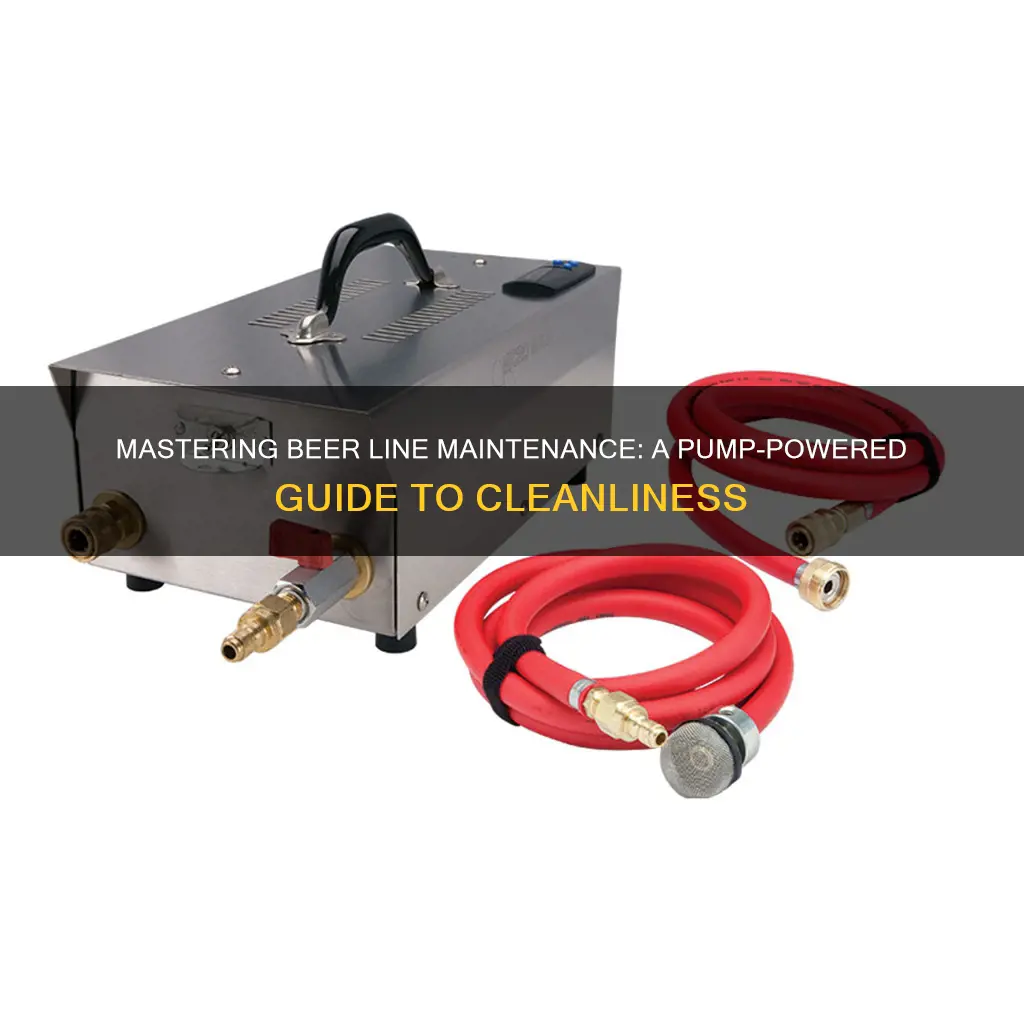
Cleaning beer lines with a pump is an essential practice to ensure the quality and taste of your beer. This method involves using a pump to push a cleaning solution through the lines, effectively removing any residual beer, yeast, or bacteria that may have accumulated. By following a systematic approach, you can maintain the purity of your beer and enhance the overall brewing experience. This guide will provide a step-by-step process to achieve optimal results.
| Characteristics | Values |
|---|---|
| Method | Using a beer line cleaner and a pump, you can effectively clean your beer lines. This method involves pumping the cleaner through the line to dislodge any residue. |
| Frequency | It is recommended to clean beer lines every 2-4 weeks, or more frequently if you notice a buildup of foam or off-flavors. |
| Materials | You will need a beer line cleaner (such as a liquid cleaner or a dry powder), a pump (a hand pump or a foot pump), and a bucket or container for the cleaner. |
| Steps | 1. Fill the bucket with the cleaner according to the manufacturer's instructions. 2. Attach the pump to the beer line and begin pumping. 3. Continue pumping until the cleaner has been pushed through the entire length of the line. 4. Turn off the pump and allow the cleaner to sit for a few minutes. 5. Rinse the line with water to remove any remaining cleaner. |
| Benefits | Regular cleaning with a pump helps to maintain the quality of your beer by preventing the buildup of bacteria, yeast, and other contaminants. It also ensures a consistent and smooth flow of beer, enhancing the overall drinking experience. |
| Precautions | Always follow the instructions provided by the cleaner manufacturer. Avoid over-pumping, as this can damage the beer line. Rinse thoroughly to avoid any residual cleaner affecting the beer's taste. |
What You'll Learn
- Prepare the Equipment: Gather cleaning supplies, including a pump, brush, and cleaning solution
- Disassemble Lines: Carefully remove sections of the beer line for thorough cleaning
- Use a Cleaning Solution: Apply a suitable detergent and let it sit for effectiveness
- Rinse Thoroughly: Rinse the lines multiple times to remove all residue
- Reassemble and Test: Put the lines back together and check for proper flow
![]()
Prepare the Equipment: Gather cleaning supplies, including a pump, brush, and cleaning solution
To effectively clean beer lines using a pump, you'll need to prepare the right equipment. Start by gathering the necessary cleaning supplies, which include a pump, a brush, and a dedicated cleaning solution. The pump is essential for circulating the cleaning agent through the lines, ensuring a thorough clean. Opt for a pump specifically designed for beer line cleaning, as these are typically made from food-grade materials to avoid any off-flavors in your beer.
Next, you'll need a brush to scrub the interior of the lines. A brush with a sturdy handle and soft, flexible bristles is ideal. This brush should be long enough to reach the deepest parts of the lines, ensuring no residue is left behind. Additionally, a cleaning solution is crucial. Choose a product specifically formulated for beer line cleaning, as these solutions are designed to dissolve and remove the buildup of beer residue, yeast, and bacteria.
Ensure that the cleaning solution is compatible with the materials used in your beer lines. Many cleaning agents are available in the market, so select one that is safe for use with the specific type of beer lines you have. It's also a good idea to have a separate cleaning solution for the pump and the lines to avoid any potential cross-contamination.
Having all these supplies ready will make the cleaning process more efficient and effective. With the right equipment, you can ensure that your beer lines are clean, free from any contaminants, and ready to deliver the best possible taste to your customers. Remember, proper cleaning is essential to maintaining the quality of your beer and the overall customer experience.
Beer's Surprising Power: Can It Clean Your Shower Head?
You may want to see also
![]()
Disassemble Lines: Carefully remove sections of the beer line for thorough cleaning
To ensure a thorough cleaning of your beer lines, it's essential to disassemble the sections that are most prone to accumulating dirt, grime, and beer residue. This process requires careful attention to detail and a systematic approach to avoid any damage to the lines. Here's a step-by-step guide on how to effectively disassemble and clean your beer lines using a pump:
- Identify the Line Sections: Start by identifying the different sections of the beer line that you will need to remove. Typically, a beer line consists of a main line, faucets, and possibly a tap handle. The main line is usually the longest and runs from the keg to the faucet. The faucets and tap handle are shorter sections that connect to the main line.
- Turn Off the Beer Supply: Before beginning the disassembly, ensure that the beer supply is turned off. This is crucial to prevent any accidental spills or beer flow during the cleaning process. Locate the shut-off valves or faucets that control the beer flow and turn them clockwise to close them.
- Remove Faucets and Tap Handle: Carefully detach the faucets and tap handle from the main line. This process may vary depending on the type of faucet and connection. Some faucets have quick-release clips or screws that hold them in place. Others might require prying or gentle prying to loosen the connection. Take your time and be gentle to avoid stripping any threads or damaging the connections. Set the faucets and tap handle aside in a clean, dry area.
- Disconnect the Main Line: Now, focus on the main beer line. Locate the connection points where the main line meets the faucets and any other accessories. Use a suitable cleaning tool, such as a line cleaner or a small screwdriver, to carefully pry open the connections. Be cautious not to force anything to avoid damaging the threads or the line itself. Once the connections are open, gently pull the main line away from the faucets to expose the inner sections.
- Inspect and Clean: With the line sections removed, you can now thoroughly inspect and clean each part. Use a pump or a compressed air tool to blow out any loose debris and beer residue. Pay close attention to the joints and connections, as these areas are prone to buildup. For a more thorough clean, consider using a specialized beer line cleaner or a mild detergent mixed with warm water. Soak the line sections in the cleaning solution, ensuring that all surfaces are covered.
- Rinse and Reassemble: After cleaning, rinse the line sections thoroughly with warm water to remove any cleaning solution residue. Make sure to rinse both the inside and outside of the lines to ensure no soap or detergent remains. Once rinsed, carefully reassemble the line sections, ensuring that all connections are secure and tight. Reattach the faucets and tap handle, and double-check all connections to guarantee a proper seal.
The Batch Reactor Debate: Beer's Fermentation Process Explored
You may want to see also
![]()
Use a Cleaning Solution: Apply a suitable detergent and let it sit for effectiveness
When it comes to maintaining the purity and quality of your beer, keeping your brewing equipment, especially the lines, clean is crucial. One effective method to ensure your beer lines are free from contaminants and off-flavors is by using a cleaning solution with a pump. This process involves applying a suitable detergent and allowing it to sit for a period to ensure optimal cleaning.
The first step is to choose a detergent specifically designed for beer line cleaning. These detergents are typically non-toxic and safe for the environment, ensuring they won't leave any harmful residues in your beer. Look for products that are alcohol-free, as alcohol can leave a sticky residue and may not fully dissolve the detergent. A popular choice is a dedicated beer line cleaner, which often comes in a concentrated form, allowing for precise measurements.
Once you've selected your detergent, it's time to prepare the cleaning solution. Start by mixing the detergent with warm water according to the manufacturer's instructions. The solution should be strong enough to cut through any built-up grime and old beer residue. Fill your pump's reservoir with this solution, ensuring it's well-mixed.
Now, attach the pump to your beer line, starting from the tap or dispensing point and working your way back to the fermenter or keg. Apply the cleaning solution to the line, ensuring an even distribution. Let the detergent sit for a specified period, usually around 10-15 minutes. This waiting time allows the detergent to penetrate and break down any stubborn deposits.
During this sitting period, the detergent will work its magic, dissolving and lifting away any dirt, yeast, and old beer particles. This process is crucial for maintaining the freshness and flavor of your beer. After the allotted time, you can rinse the line thoroughly with warm water to remove any remaining detergent and ensure a spotless finish. This method of cleaning ensures that your beer lines are not only clean but also ready to dispense beer with minimal dilution.
Unlocking the Perfect Fermentation: Sour Beer Pressure Secrets
You may want to see also
![]()
Rinse Thoroughly: Rinse the lines multiple times to remove all residue
Rinsing the beer lines is a crucial step in the cleaning process, ensuring that any remaining beer residue, yeast, or bacteria are completely removed. This step is often overlooked, but it plays a vital role in maintaining the quality of your beer and the longevity of your equipment. Here's a detailed guide on how to rinse the lines effectively:
Begin by attaching a large-bore hose to the beer line's outlet, ensuring it is securely connected. This hose will be used to flush out the lines. Turn on the pump and allow it to run for a few seconds to create a steady flow of water. The goal is to create a strong, consistent stream of water that can dislodge any stubborn residue. Start with a slow, gentle flow, gradually increasing the pressure as you go. This controlled approach ensures that you're not forcing water into the lines too quickly, which could lead to potential damage.
As the water starts to flow, you'll notice a change in the appearance of the water coming out of the hose. Initially, it might appear cloudy or slightly colored, but as you continue, the water should become clearer. This indicates that you're flushing out the beer residue and any built-up debris. Continue this process for at least 30 seconds to a minute, ensuring that you cover the entire length of the line. The key is to be thorough and consistent in your rinsing.
After the initial flush, it's time to really get those lines clean. Increase the pressure slightly and let the water flow for another 30-60 seconds. This additional force will help dislodge any remaining residue that might be stuck in the lines. You should see a more significant improvement in the water's clarity during this stage. Remember, the goal is to ensure that no beer-related particles are left behind, as these can affect the taste and quality of your brew.
Finally, turn off the pump and disconnect the hose. Inspect the water coming out of the hose; it should now be completely clear, indicating that you've successfully removed all the beer residue. Repeat this rinsing process multiple times, especially if you've noticed any lingering flavors or if it's been a while since your last cleaning. Multiple rinses ensure that you're not just moving residue around but actually removing it, leaving your beer lines fresh and ready for the next brew.
The Surprising Effect of Salt on Beer: A Tasty Twist
You may want to see also
![]()
Reassemble and Test: Put the lines back together and check for proper flow
After cleaning your beer lines with a pump, it's crucial to reassemble them properly and conduct a thorough test to ensure optimal performance. This step is often overlooked, but it's essential to guarantee that your beer remains fresh and flavorful. Here's a detailed guide on how to reassemble and test your beer lines:
Reassembly:
- Start by ensuring that all components are clean and dry. This includes the beer line itself, the fittings, and any other parts that were removed during the cleaning process. Moisture can lead to mold and off-tasting beer, so thorough drying is essential.
- Reattach the fittings securely. Tighten them by hand first, then use a wrench to ensure a firm connection. Over-tightening can damage the fittings, so be careful and use the appropriate size wrench.
- Check for any leaks at the connections. You can do this by applying a small amount of pressure to the fittings and observing if there are any drips. If you notice any leaks, tighten the fittings further or consider using thread seal tape or pipe compound to create a tighter seal.
- Reconnect the pump to the beer line, ensuring that all connections are secure and aligned correctly.
Testing for Proper Flow:
- Turn on your beer pump and observe the flow. It should be smooth and consistent, indicating that the line is properly reassembled.
- Check for any blockages or restrictions in the line. If the flow is inconsistent or slow, there might be a blockage. In this case, carefully inspect the line for any debris or residue that could be causing the issue. You may need to disassemble the line again and clean it further.
- Measure the flow rate to ensure it meets your expectations. You can use a flow meter or a simple timing method to measure the volume of beer dispensed over a set period. Compare this with the manufacturer's recommended flow rate for your specific beer line setup.
- If everything looks good, you can now serve your beer with confidence, knowing that your lines are clean, reassembled correctly, and functioning optimally.
Remember, proper reassembly and testing are critical to maintaining the quality of your beer. By taking the time to follow these steps, you'll ensure that your beer lines remain in excellent condition, providing a consistent and enjoyable drinking experience.
Blue Moon's Secret: Lactose or Not? Unveiling the Truth
You may want to see also
Frequently asked questions
Cleaning beer lines with a pump is an effective way to maintain the quality of your brew. Start by flushing the lines with hot water to remove any loose particles. Then, use a cleaning solution specifically designed for beer lines, such as a 50/50 mix of bleach and water or a specialized beer line cleaner. Attach the pump to the line and slowly pump the solution through, ensuring it reaches every part of the line. Let it sit for a few minutes, then rinse thoroughly with hot water to remove any residue.
Regular cleaning is essential to prevent off-flavors and maintain the freshness of your beer. It is recommended to clean your beer lines every 2-4 weeks, or more frequently if you notice any signs of contamination, such as a strange taste or appearance. Additionally, after brewing a new batch, it's a good practice to clean the lines to avoid any carryover of old beer or cleaning solution.
While any pump can be used to push cleaning solutions through the lines, a dedicated beer line cleaning pump is designed with features that make the process more efficient and effective. These pumps often have a built-in filter to catch debris, a adjustable flow rate for precise control, and a durable construction to withstand the pressure and chemicals used in cleaning. Investing in a specialized pump can ensure a thorough clean and help extend the life of your beer lines.