Filtering beer before fermentation is a crucial step in the brewing process that can significantly impact the final product's quality and character. This technique involves removing any unwanted particles, such as yeast, proteins, and other solids, from the beer to ensure a clear and stable fermentation process. There are several methods to achieve this, including using a brewing sieve, a filter bag, or a brewing filter press. Each method has its advantages and can be chosen based on the specific needs of the brewer and the style of beer being produced. Understanding the proper techniques and equipment for filtering beer is essential for achieving the desired flavor, clarity, and overall quality of the final brew.
What You'll Learn
- Sanitization: Clean equipment to prevent bacterial contamination
- Temperature Control: Maintain optimal temperature for yeast activity
- Oxygen Management: Ensure adequate oxygen transfer during fermentation
- Carbon Dioxide Levels: Monitor CO2 to prevent overflow
- Clarification Techniques: Use filtration methods to remove sediment
![]()
Sanitization: Clean equipment to prevent bacterial contamination
Sanitization is a critical step in the brewing process, especially when it comes to preventing bacterial contamination in your beer. It's a simple yet powerful practice that can significantly impact the quality and safety of your final product. The goal is to create an environment that is inhospitable to bacteria, ensuring that your beer ferments as intended without any unwanted microbial activity.
When sanitizing your equipment, the primary focus should be on eliminating bacteria and other microorganisms that could contaminate the beer. This is crucial because even a small amount of bacteria can lead to off-flavors, cloudiness, and potential health issues. The process involves using chemicals or physical methods to kill or inhibit the growth of these microorganisms.
One common and effective method is using a chlorine-based sanitizing solution. Bleach is a popular choice, but it's essential to use it carefully and in the correct proportions. A common ratio is 1 tablespoon of bleach per 5 gallons of water. This solution should be used to sanitize all surfaces that will come into contact with the beer, including the fermenter, taps, and any other brewing equipment. It's important to follow the instructions on the bleach container and to ensure that the solution is mixed thoroughly.
Another effective sanitizing agent is iodine, which is often used in the form of a 1% solution. This solution is particularly useful for sanitizing glassware and utensils. Iodine is highly effective at killing a wide range of microorganisms and leaves a residual effect, providing ongoing protection. However, it's crucial to rinse any iodine-sanitized equipment thoroughly to remove any residual iodine, as it can leave a slight blue tint and potentially affect the beer's flavor.
In addition to chemical sanitizers, physical methods can also be employed. Boiling water is a simple and effective way to sanitize equipment by killing any bacteria present. This method is especially useful for sanitizing glassware and utensils that will be in direct contact with the beer. Additionally, using a blow-out sanitizing system, which involves running a sanitizing solution through the brewing system, can ensure that all parts are thoroughly cleaned and sanitized.
Remember, consistency is key when it comes to sanitization. Always follow a strict sanitization protocol before and after each brewing session to maintain a clean and safe brewing environment. This practice will not only improve the quality of your beer but also contribute to a longer shelf life and a more enjoyable drinking experience.
Binge-Drinking Blues: Beer Limits and the Legal Line
You may want to see also
![]()
Temperature Control: Maintain optimal temperature for yeast activity
Temperature control is a critical aspect of brewing beer, especially when it comes to the fermentation process. Yeast, the microorganism responsible for converting sugars into alcohol and carbon dioxide, is highly sensitive to temperature variations. Maintaining the optimal temperature range for yeast activity is essential to ensure a successful fermentation and a high-quality beer. Here's a detailed guide on how to achieve this:
Understanding Yeast Temperature Preferences: Different yeast strains have specific temperature requirements for optimal performance. For most ale yeasts, the ideal temperature range is between 65°F and 75°F (18°C to 24°C). This range promotes healthy yeast activity and efficient fermentation. On the other hand, lager yeasts typically thrive in cooler temperatures, around 50°F to 60°F (10°C to 15°C). It's crucial to identify the type of yeast you are using and adjust your temperature control accordingly.
Pre-fermentation Temperature: Before transferring the beer to the fermenter, consider the temperature of the wort (the sugary liquid extracted from the grains). If the wort is too warm, it can stress the yeast and lead to off-flavors. Allow the wort to cool to the desired temperature range for your chosen yeast. For ale yeasts, a pre-fermentation temperature of around 68°F (20°C) is often recommended. For lagers, a slightly cooler temperature of 59°F (15°C) can be ideal. This initial temperature adjustment gives the yeast a gentle start and promotes a clean fermentation profile.
Fermentation Temperature Control: Once the beer is transferred to the fermenter, maintaining a consistent temperature becomes even more critical. Invest in a reliable fermentation temperature controller or use a heating/cooling system to regulate the temperature. Keep the fermenter in a stable environment, away from direct sunlight or heat sources that could cause temperature fluctuations. For ale brewing, monitoring the temperature at 68-72°F (20-22°C) is common, while lager yeasts benefit from a slightly cooler environment. Regularly check the temperature and make adjustments as needed to ensure it remains within the optimal range.
Using Temperature-Controlled Fermenters: Consider investing in a temperature-controlled fermenter or using a specialized brewing kit that includes a fermenter with temperature regulation capabilities. These devices maintain a consistent temperature throughout the fermentation process, providing an ideal environment for yeast activity. They often feature digital displays and precise control, allowing you to set and monitor the desired temperature with ease.
Monitoring and Adjusting: Yeast activity can be influenced by temperature, so regular monitoring is essential. Use a reliable thermometer to check the fermenter's temperature multiple times a day. If the temperature deviates from the optimal range, take immediate action. For cooling, you can use a cooling jacket or a water bath. For heating, consider using a small electric heater or a heat exchanger. Quick adjustments will ensure the yeast remains happy and active, leading to a successful fermentation.
Brewing Basics: Adding Hops for Flavor and Aroma
You may want to see also
![]()
Oxygen Management: Ensure adequate oxygen transfer during fermentation
Oxygen management is a critical aspect of brewing, especially when it comes to ensuring a successful fermentation process. Adequate oxygen transfer is essential for yeast to perform its role effectively, which directly impacts the quality and character of the final beer. Here's a detailed guide on how to manage oxygen during fermentation:
Understanding Oxygen Requirements: Yeast, the microorganisms responsible for fermentation, require a specific amount of oxygen to initiate the process. This initial burst of oxygen is crucial for the yeast to begin metabolizing sugars and producing alcohol and carbon dioxide. However, once the fermentation process is underway, excessive oxygen can be detrimental. It can lead to off-flavors, increased esters, and even a phenomenon known as "oxygenation" or "aeration," which can cause a loss of flavor and aroma compounds in the beer.
Initial Oxygenation: When transferring beer to the fermenter, it is common practice to add a small amount of oxygen to stimulate yeast activity. This is often done by sparging (bubbling) the beer with air or oxygen-enriched air. The goal is to provide a sufficient oxygen dose to activate the yeast without over-oxygenating the mixture. This initial burst of oxygen can be controlled by adjusting the sparge rate and the duration of the sparge.
Maintaining Fermentation Conditions: After the initial oxygenation, the focus shifts to maintaining a controlled environment during fermentation. Yeast activity should be sustained without excessive oxygen exposure. This is typically achieved by using a fermentation lock or airlock, which allows carbon dioxide to escape while preventing oxygen from entering the fermenter. The airlock ensures that the yeast continues to work in a healthy, anaerobic environment, producing alcohol and carbon dioxide without the negative effects of excess oxygen.
Monitoring and Adjusting: Throughout the fermentation process, brewers should closely monitor the beer's condition. This includes checking for signs of healthy yeast activity, such as a clear, active yeast layer, and ensuring the beer's temperature is maintained at the optimal range for the chosen yeast strain. If the fermentation seems sluggish or if off-flavors are detected, adjusting the oxygen levels can be a crucial step in troubleshooting. This might involve adding more oxygen or, conversely, reducing the oxygen exposure to encourage a different yeast behavior.
Post-Fermentation Considerations: After fermentation, the beer is ready for conditioning and aging. During this stage, oxygen management is still important but with a different focus. The beer should be kept in a stable, oxygen-free environment to prevent any negative impacts on flavor and aroma. This is often achieved by using nitrogen gas to carbonate the beer, ensuring a smooth and natural carbonation process.
By carefully managing oxygen levels during fermentation, brewers can optimize the yeast's performance, resulting in a well-balanced, flavorful beer. It is a delicate process that requires attention to detail and an understanding of the yeast's needs at each stage of the brewing journey.
Capturing the Magic: Does Photography Alter Beer's Fermentation?
You may want to see also
![]()
Carbon Dioxide Levels: Monitor CO2 to prevent overflow
Monitoring carbon dioxide (CO2) levels is a critical aspect of the brewing process, especially when transferring beer from the fermenter to the conditioning vessel. Proper CO2 management ensures a smooth and safe operation, preventing overflow and potential mess. Here's a detailed guide on how to monitor and control CO2 levels to avoid any unwanted incidents:
Understanding the Role of CO2: During fermentation, yeast consumes sugars and produces alcohol and CO2 as byproducts. This CO2 is dissolved in the beer and forms a layer of foam on the surface. As the fermentation progresses, the CO2 production increases, and it needs to be managed effectively. If not controlled, the rising CO2 can lead to an overflow, especially when transferring beer to another vessel.
Monitoring CO2 Levels: Regularly check the CO2 levels in your fermenter. You can use a simple hydrometer to measure the specific gravity of the beer, which indirectly indicates the CO2 concentration. As fermentation progresses, the specific gravity should gradually decrease, signaling a reduction in CO2. However, it's essential to monitor this regularly, especially towards the end of fermentation, to catch any sudden spikes in CO2 production.
Preventing Overflow: To prevent overflow, you should aim to manage the CO2 levels by controlling the fermentation temperature and yeast activity. Lowering the fermentation temperature can slow down yeast activity and reduce CO2 production. Additionally, using a blow-off tube is an effective method. This tube allows you to release excess CO2 and beer from the fermenter, ensuring that the beer level remains stable. Regularly open the blow-off tube to release CO2, especially when the beer is almost ready for transfer.
Transferring Beer Safely: When it's time to transfer the beer, ensure that the CO2 levels are stable and manageable. Avoid transferring when the beer is actively fermenting, as this can lead to an overflow. Instead, wait until the fermentation has slowed down, and the CO2 levels are at a safe, manageable point. Use a sanitized siphoning technique to transfer the beer, allowing you to control the flow and prevent any sudden bursts of CO2.
Maintaining Consistency: Consistency is key to successful beer filtering. Monitor the fermentation process closely, making notes on temperature, yeast type, and any unusual occurrences. This data will help you understand the specific CO2 dynamics of your beer and allow for better control in the future. By paying close attention to CO2 levels, you can ensure a clean and efficient transfer, resulting in a high-quality beer product.
The Perfect Pairing: Why Lime and Beer Go Together Like Mexico and Summer
You may want to see also
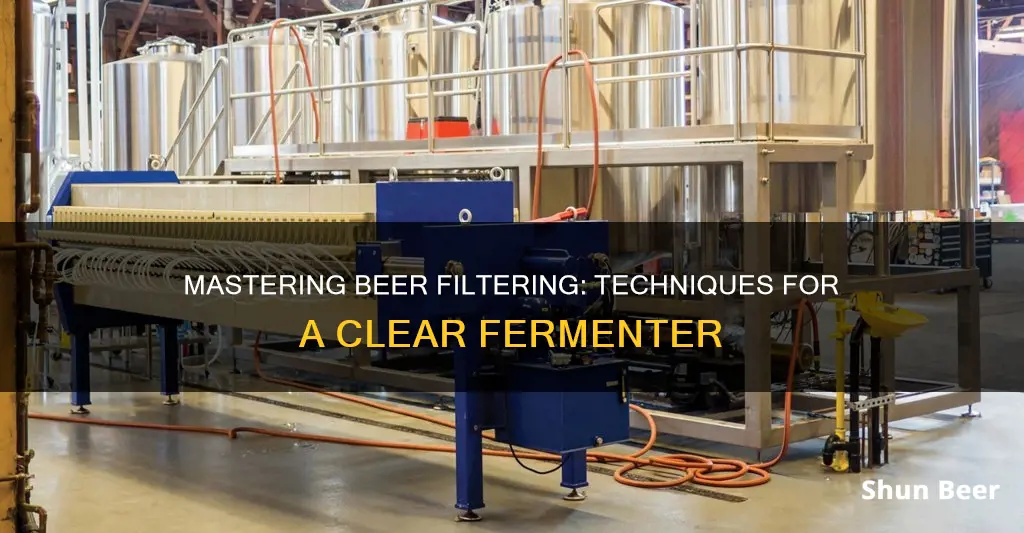
![]()
Clarification Techniques: Use filtration methods to remove sediment
When it comes to brewing beer, achieving a clear and stable product is essential for a successful fermentation process. One of the key steps in this process is clarification, which involves removing any unwanted particles and sediment that may have formed during the brewing process. Filtration is a common and effective technique used by brewers to clarify their beer and ensure a smooth fermentation.
There are several filtration methods that can be employed to remove sediment and achieve a clear beer. One of the most traditional and widely used methods is the use of a false bottom or lauter tun. This technique involves placing a screen or mesh at the bottom of the brew kettle, allowing the liquid to pass through while retaining the sediment. The false bottom is typically made of a fine mesh or wire mesh, ensuring that even the smallest particles are caught. This method is often used in the lauter phase of brewing, where the wort (the sugary liquid extracted from the grains) is separated from the spent grain husks.
Another filtration method is the use of a plate and frame filter press. This equipment consists of a series of plates with perforations, creating a series of channels for the liquid to flow through. The beer is forced through these channels, and the sediment is retained on the plates, allowing for a clear and filtered liquid to pass through. This method is highly efficient and can handle large volumes of beer, making it suitable for commercial brewing operations.
For homebrewers, a simple yet effective filtration method is the use of a cheesecloth or muslin cloth. After the primary fermentation, the beer can be transferred to a secondary fermenter, and the cloth can be placed over the opening of the primary fermenter. The beer is then carefully poured through the cloth, allowing it to filter and separate from the sediment. This technique is straightforward and requires minimal equipment, making it accessible to brewers of all levels.
In addition to these methods, some brewers also utilize sediment traps or hop backs. These are containers placed at the end of the brewing system, designed to catch and retain sediment as the beer flows through. The beer is then carefully decanted, leaving the sediment behind. This technique is particularly useful for managing sediment accumulation in larger brewing setups.
By employing these filtration methods, brewers can effectively remove sediment and clarify their beer, ensuring a smooth and successful fermentation process. Each method offers unique advantages and can be tailored to suit different brewing setups and preferences.
Chill Your Beer: The Ultimate Guide to Storage
You may want to see also
Frequently asked questions
Filtering beer is a crucial step in the brewing process as it helps to remove any unwanted particles, such as yeast, proteins, and sediment, which can affect the clarity and flavor of the final product. This ensures a smoother and more enjoyable drinking experience.
The choice of filter depends on the type of beer you are brewing and your personal preferences. For most homebrews, a mesh strainer or a cheesecloth can be effective for removing large particles. However, for a more refined and clear beer, consider using a coffee filter, a fine mesh strainer, or even a specialized brewing filter designed for beer, which often has a finer mesh to capture smaller particles.
Yes, filtering directly into the fermenter is a common practice. This method is known as "direct-transfer" or "dry hopping." It involves transferring the beer from the brew kettle to the fermenter while it is still warm, allowing the yeast to be added directly into the beer. This process can be efficient and helps maintain the beer's temperature, promoting a faster fermentation.
Here are a few tips to ensure a smooth filtering process:
- Let the beer cool down to room temperature before filtering to avoid any issues with yeast activation.
- Use a sanitized strainer or filter to prevent any contamination.
- Gently pour the beer through the filter, avoiding any aggressive movements that might disturb the sediment.
- Consider using a siphoning technique, which is a controlled and efficient way to transfer the beer while keeping the sediment behind.