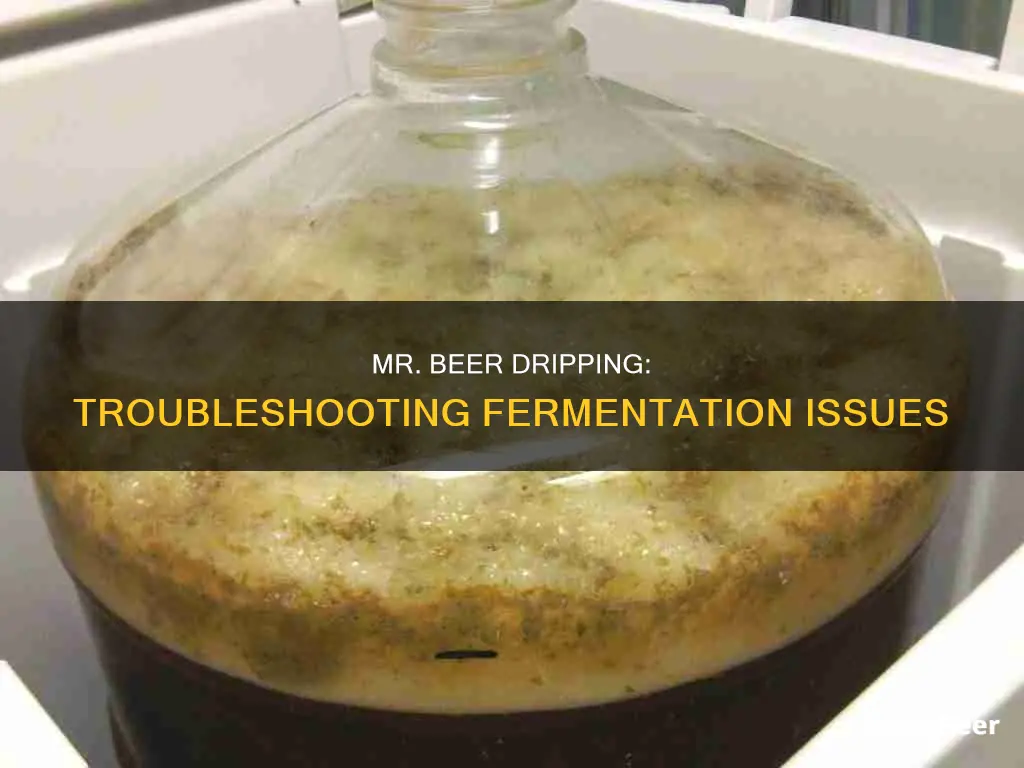
During the fermentation process of homemade beer, it's not uncommon to encounter various challenges, and one such issue could be the dripping of Mr. Beer from the spigot. This phenomenon might indicate a few potential problems, such as an overactive yeast, which can lead to a rapid and uncontrolled fermentation. This could result in a strong alcohol content and an off-putting flavor. Alternatively, it could be a sign of a compromised seal or a faulty spigot, which may allow air to enter the system, causing the beer to spoil. Understanding and addressing these potential causes can help ensure a successful and enjoyable brewing experience.
| Characteristics | Values |
|---|---|
| Potential Cause | A dripping spigot during fermentation could indicate a poorly sealed container or a faulty spigot mechanism. |
| Impact on Fermentation | The continuous dripping might lead to an uneven distribution of ingredients, affecting the overall flavor and quality of the beer. |
| Solution | Check the container's seal and ensure it is tightly closed. Consider using a different spigot or adjusting the fermentation setup to prevent dripping. |
| Prevention | Regularly inspect the spigot and container for any signs of damage or leakage. Maintaining a clean and sealed environment during the fermentation process is crucial. |
| Alternative Methods | Consider using a fermentation lock or bung to secure the container and prevent airlock, which might help reduce dripping. |
What You'll Learn
- Spill Control: Use a bucket or container to catch drips and prevent contamination
- Temperature Management: Keep the fermentation vessel at a consistent temperature to avoid off-flavors
- Airlock Maintenance: Ensure the airlock is functioning properly to release CO2 and prevent spillage
- Ingredient Quality: Verify the quality of ingredients to prevent unexpected reactions during fermentation
- Sanitation: Regularly sanitize equipment to prevent bacterial growth and maintain beer quality
![]()
Spill Control: Use a bucket or container to catch drips and prevent contamination
When brewing beer, it's crucial to maintain a clean and controlled environment to ensure the best results. One common issue that brewers might encounter during the fermentation process is a dripping spigot, which can lead to several problems. To address this, a simple yet effective solution is to employ spill control measures.
The first step is to be prepared and have the necessary equipment ready. Place a bucket or a large container beneath the spigot, ensuring it is positioned directly below the opening. This container will act as a catch-all for any potential drips or overflows. It's essential to use a sturdy and leak-proof bucket to avoid any unwanted spillage onto your work area or equipment.
As the fermentation process progresses, keep an eye on the spigot. If you notice any drips or small amounts of liquid escaping, gently guide the drips into the bucket. This methodical approach prevents the liquid from spreading across your workspace, reducing the risk of contamination. Regularly check the bucket to ensure it doesn't overflow, especially if the fermentation is ongoing for an extended period.
In addition to using a bucket, consider covering the spigot with a cloth or a small piece of equipment to provide an extra layer of protection. This simple technique can help absorb any minor drips and keep the area around the spigot clean. By combining these spill control methods, you can effectively manage the dripping spigot and maintain a controlled brewing environment.
Remember, the goal is to minimize the impact of any potential spills and maintain the integrity of your beer-making process. With these simple steps, you can ensure a smooth fermentation and produce high-quality beer. Regularly inspect your equipment and be proactive in managing any potential issues to achieve consistent and desirable results in your brewing endeavors.
Chili Peppers and Beer: A Spicy Brew Adventure
You may want to see also
![]()
Temperature Management: Keep the fermentation vessel at a consistent temperature to avoid off-flavors
Fermentation is a delicate process, and temperature control is crucial to achieving the desired results. When it comes to brewing beer, maintaining a consistent temperature is essential to prevent off-flavors and ensure a successful fermentation. If you notice Mr. Beer dripping from the spigot during fermentation, it could be an indication of temperature fluctuations, which can have a significant impact on the beer's quality.
The ideal temperature range for most beer fermentations is between 65°F and 75°F (18°C and 24°C). Keeping the fermentation vessel within this range helps to promote healthy yeast activity and enzyme function. Yeast, the microorganisms responsible for fermentation, are sensitive to temperature changes. If the temperature drops too low, yeast activity slows down, and fermentation may stall. On the other hand, if the temperature rises too high, yeast can become stressed, leading to off-flavors and potential spoilage.
One effective way to manage temperature is to use a fermentation chamber or a dedicated brewing refrigerator. These appliances provide a controlled environment, allowing you to maintain a consistent temperature throughout the fermentation process. Ensure that the chamber is set to the appropriate temperature and that it has adequate insulation to prevent heat loss or gain. Regularly monitor the temperature inside the chamber to make any necessary adjustments.
Another technique is to use a temperature-controlled fermenter with a built-in thermometer and a heating/cooling system. This type of fermenter can automatically maintain the desired temperature, ensuring that your beer ferments optimally. It's important to keep the fermenter clean and sanitized to prevent any unwanted temperature variations caused by contaminants.
Additionally, consider the placement of your fermentation vessel. Avoid direct sunlight or heat sources, as this can cause temperature fluctuations. Keep the vessel away from windows, ovens, or any other heat-emitting appliances. Insulating the fermentation area can also help maintain a stable temperature. By implementing these temperature management strategies, you can ensure that your beer ferments smoothly and develops the desired flavors.
Master the Art of Beer in Your Margarita: A Guide to the Perfect Blend
You may want to see also
![]()
Airlock Maintenance: Ensure the airlock is functioning properly to release CO2 and prevent spillage
Airlock maintenance is a critical aspect of homebrewing, especially when dealing with the unique challenges of brewing beer. The airlock, a small but essential component, plays a vital role in the fermentation process, ensuring a safe and controlled environment for your yeast to work its magic. Here's a detailed guide on how to maintain your airlock to prevent potential issues during fermentation:
Understanding the Airlock's Role: Before delving into maintenance, it's crucial to understand the airlock's primary function. During fermentation, yeast consumes sugars and produces alcohol and carbon dioxide (CO2). This CO2 needs to be released from the fermenter to prevent a buildup of pressure, which could lead to spillage or even damage to the container. The airlock acts as a valve, allowing CO2 to escape while preventing oxygen from entering the fermenter, which could inhibit yeast activity.
Regular Inspection: Start by regularly inspecting your airlock. Check for any signs of damage, such as cracks or a broken seal. A damaged airlock may not function properly, leading to CO2 retention and potential spillage. Ensure that the airlock is securely attached to the fermenter and that the spigot (the small opening at the bottom of the airlock) is clear of any debris or blockages.
Functionality Testing: To ensure the airlock is working correctly, perform a simple test. Place a small amount of water in the fermenter and cover it with the airlock. If the airlock is functioning properly, you should be able to see bubbles forming and rising through the water as CO2 is released. If no bubbles appear, it indicates a potential issue that needs to be addressed.
Preventing Spillage: One of the most critical aspects of airlock maintenance is preventing spillage. Here are some tips:
- Tighten Connections: Ensure all connections are tight and secure. Loose connections can lead to airlocks not sealing properly, allowing air to enter and potentially causing spillage.
- Regular Cleaning: Keep the airlock and the surrounding area clean. Debris or residue can interfere with the airlock's function. Clean the airlock regularly, especially if you notice any unusual odors or flavors, which could indicate contamination.
- Monitor Fermentation: Keep an eye on the fermentation process. If you notice excessive dripping from the spigot, it might indicate a problem. This could be due to a faulty airlock, an over-fermented batch, or even a blocked spigot. In such cases, investigate the issue and take appropriate action.
Troubleshooting: If you encounter issues with your airlock, here are some troubleshooting steps:
- Replace the Airlock: If the airlock is damaged, replace it with a new one. Ensure you get the correct size and type for your fermenter.
- Check Yeast Activity: Sometimes, yeast activity can slow down, leading to less CO2 production. If you suspect this, consider adding more yeast or using a yeast starter to boost fermentation.
- Adjust Fermentation Temperature: Yeast activity is temperature-dependent. If the temperature is too low, yeast activity may slow down, affecting CO2 release. Adjust the temperature accordingly to optimize fermentation.
By following these maintenance practices, you can ensure that your airlock functions optimally, allowing for a successful fermentation process and a delicious brew. Remember, proper airlock maintenance is key to preventing spillage and maintaining the quality of your homemade beer.
Uncorking the Mystery: Why Nitrogen Enhances Beer's Experience
You may want to see also
![]()
Ingredient Quality: Verify the quality of ingredients to prevent unexpected reactions during fermentation
When it comes to brewing beer, the quality of ingredients is paramount to ensure a successful fermentation process. One crucial aspect often overlooked is the verification of ingredient quality, which can significantly impact the outcome of your brew. Here's an in-depth look at why this step is essential and how it relates to the scenario of a dripping spigot during fermentation.
Ingredient Quality and Fermentation:
The fermentation process is a delicate balance of microorganisms interacting with the beer's ingredients. Any impurities or subpar quality in the ingredients can lead to unexpected reactions, affecting the beer's flavor, clarity, and overall quality. For instance, if you use old or low-quality hops, they may not contribute the desired bitterness or aroma, resulting in a flat and unappealing beer. Similarly, using stale or inferior malt can lead to off-flavors and a less-than-perfect fermentation profile.
Verifying Ingredient Quality:
To prevent such issues, it is imperative to verify the quality of your ingredients. Here are some practical steps:
- Storage and Freshness: Store your ingredients properly to maintain their freshness. Hops, for example, should be kept in a cool, dry place to preserve their volatile oils. Regularly check the expiration dates of your malt and yeast, ensuring they are not past their prime.
- Sensory Evaluation: Engage your senses. High-quality ingredients will have distinct aromas and flavors. For malt, a fresh, sweet smell is desirable, while hops should offer a burst of citrus or floral notes. Any off-odors or tastes should be a red flag.
- Testing and Analysis: Consider investing in testing kits or sending samples to laboratories for analysis. This is especially important for homebrewers or those experimenting with unique ingredients. Testing can reveal the alcohol content, pH levels, and the presence of unwanted contaminants.
Dripping Spigot Scenario:
Now, let's relate this to the dripping spigot during fermentation. If the issue is due to poor ingredient quality, it could be a result of using subpar yeast or malt. For instance, if the yeast is not active or is of low quality, it might struggle to ferment the sugars effectively, leading to a dripping spigot. This could also indicate a lack of carbon dioxide production, causing the beer to spill over. On the other hand, if the malt is not properly converted during the mashing process, it may result in a sticky, syrupy consistency, making it difficult for the beer to flow freely from the spigot.
By ensuring the highest quality of ingredients and implementing rigorous verification processes, you can minimize the chances of such issues during fermentation. This attention to detail will ultimately contribute to the success and consistency of your beer-making endeavors. Remember, the quality of your ingredients is a cornerstone of brewing excellence.
The Ideal Appearance of Beer During Fermentation: A Guide
You may want to see also
![]()
Sanitation: Regularly sanitize equipment to prevent bacterial growth and maintain beer quality
Sanitation is a critical aspect of homebrewing, especially when it comes to preventing bacterial contamination during the fermentation process. If you notice Mr. Beer dripping from the spigot during fermentation, it could be a sign of bacterial activity, which can lead to off-flavors, cloudiness, and even spoilage. Here's why regular sanitation is essential and how to implement it:
Preventing Bacterial Growth: Bacteria can thrive in the presence of nutrients and moisture, and your brewing equipment provides an ideal environment for their growth. When bacteria multiply, they can produce compounds that affect the beer's taste and appearance. For instance, lactic acid bacteria can cause a sour taste, while other bacteria might lead to a cloudy or hazy beer. Regular sanitation helps eliminate these potential contaminants, ensuring your beer remains clear, crisp, and free from undesirable flavors.
Maintaining Beer Quality: Sanitation is key to preserving the integrity of your beer's flavor profile. Bacterial contamination can introduce unwanted esters, acetaldehyde, and other compounds that can alter the beer's character. For example, Brettanomyces bacteria can contribute to a fruity, spicy flavor, but in excess, they can make the beer taste 'off' and unappealing. By maintaining a clean brewing environment, you can control the fermentation process and achieve the desired beer style.
Sanitation Techniques: To prevent bacterial growth, it's essential to adopt a comprehensive sanitation routine. Here are some steps to follow:
- Clean and Disinfect: Regularly clean your brewing equipment, including the fermenter, airlock, and spigot. Use hot soapy water to remove any visible dirt or residue. Then, sanitize the equipment with a suitable disinfectant, such as a chlorine bleach solution or a specialized brewery disinfectant. Pay attention to all surfaces, especially those that come into contact with the beer.
- Hygiene: Maintain good personal hygiene when handling the beer. Wash your hands thoroughly before and after brewing to prevent transferring bacteria from your skin to the equipment. Keep your brewing area clean and free from food debris, as these can attract and support bacterial growth.
- Use Sanitary Techniques: When transferring beer or adding ingredients, use sterile equipment and techniques. This includes using sanitized transfer tubes, syringes, and containers. Avoid swirling or agitating the beer in the fermenter, as this can introduce oxygen and promote bacterial growth.
- Regular Maintenance: Implement a regular sanitation schedule. After each brewing session, clean and sanitize the equipment promptly. For fermenters, this might involve a thorough cleaning followed by a sanitizing rinse. Regular maintenance ensures that any potential bacterial sources are eliminated.
By adhering to these sanitation practices, you can significantly reduce the risk of bacterial contamination during fermentation. This will result in a higher-quality beer with the desired flavors and characteristics. Remember, proper sanitation is an essential investment in the art of homebrewing, ensuring every batch is a success.
The Art of Beer Sampling: Timing is Everything
You may want to see also
Frequently asked questions
If you notice dripping from the spigot, it could indicate a few potential issues. First, check the fermentation vessel's temperature. If it's too warm, the yeast might be active too quickly, causing the beer to overflow. Consider transferring the mixture to a cooler environment or adding more ice to regulate the temperature. Additionally, ensure that the spigot is properly sealed and that there are no airlocks in the system, as this can lead to pressure buildup and dripping.
To prevent dripping, maintain a consistent and controlled fermentation environment. Keep the temperature stable and within the recommended range for your specific Mr. Beer recipe. Regularly monitor the fermentation vessel and adjust the temperature if needed. Additionally, ensure that the spigot is tightly sealed and consider using a bung or airlock to allow gases to escape while preventing liquids from flowing out.
Yes, it is common for some dripping to occur during the initial stages of fermentation. This is often due to the yeast's activity and the release of carbon dioxide. However, if the dripping becomes excessive or persistent, it may indicate an issue with the setup or temperature control. In such cases, review your fermentation process and make adjustments to ensure a smooth and controlled environment.
If the dripping is minimal and under control, you can continue the fermentation process. However, it's essential to monitor the situation closely. Keep an eye on the spigot and the fermentation vessel's pressure. If the dripping increases or becomes more frequent, take appropriate measures to address the issue, such as adjusting the temperature or improving the sealing of the spigot. Regularly checking and maintaining your setup will help ensure a successful fermentation.