When it comes to organizing your beer fridge, the placement of beer taps on a keezer is a crucial consideration. The keezer, or beer fridge, is a dedicated space for storing and serving cold beverages, and the strategic placement of taps can significantly impact the overall drinking experience. Whether you're setting up a home bar or a commercial establishment, understanding the optimal locations for beer taps is essential to ensure easy access and efficient flow. This paragraph will explore the various factors to consider when deciding where to place these taps, including the height, visibility, and accessibility for guests, as well as the overall design and layout of the keezer.
What You'll Learn
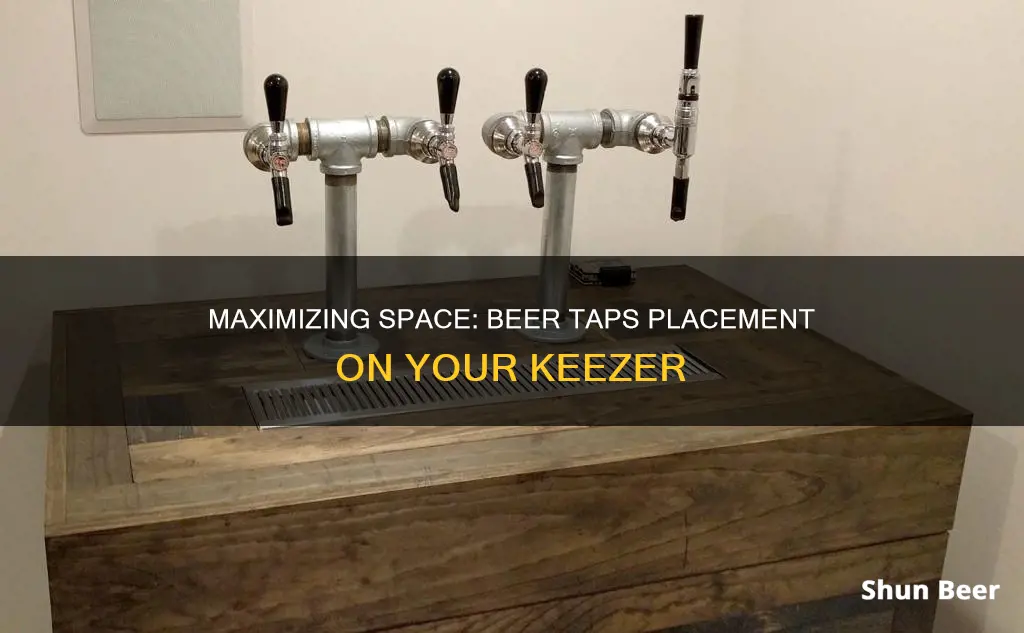
- Countertop Placement: Position taps near the front for easy access and visibility
- Fridge Organization: Arrange taps in a way that maximizes airflow and prevents condensation
- Height Considerations: Place taps at a comfortable height for pouring and serving
- Lighting Impact: Ensure adequate lighting to showcase the beer and enhance the experience
- Accessibility: Strategically place taps for easy reach and efficient serving
![]()
Countertop Placement: Position taps near the front for easy access and visibility
When designing the layout of your keezer, countertop placement is a crucial aspect to consider, especially when it comes to positioning the beer taps. The goal is to ensure that your guests can easily access and enjoy their favorite brews without any hassle. Here's a detailed guide on why and how to place the taps near the front of your countertop:
Accessibility and Convenience: Placing the beer taps closer to the front of the keezer provides easy access for your guests. Imagine a busy gathering where everyone is eager to grab a drink. By positioning the taps at the front, you create a natural flow for people to reach out and choose their preferred beer. This simple act of convenience can significantly enhance the overall drinking experience, making it more enjoyable and efficient.
Visual Appeal and Visibility: The front of the countertop is the most visible area, and placing the taps here ensures they are easily noticed. This visual appeal can be a great conversation starter and adds to the overall ambiance of your keezer setup. Guests can quickly scan the options and make their selections, creating a lively and interactive atmosphere.
Space Optimization: Countertop space is often limited, especially in smaller keezer setups. By placing the taps near the front, you make efficient use of the available space. This positioning allows for better organization and ensures that other items or decorations don't obstruct the view or access to the taps. It creates a neat and tidy appearance, which is particularly important in social settings.
Flow of Traffic: Consider the natural flow of people moving around your keezer. By placing the taps at the front, you guide the traffic in a way that encourages guests to move through the area. This strategic placement can help manage the crowd and prevent bottlenecks, ensuring a smooth and pleasant experience for everyone.
In summary, positioning the beer taps near the front of the countertop is a practical and thoughtful design choice. It enhances accessibility, visibility, and the overall user experience. With this simple adjustment, you can create a well-organized and inviting space for your beer-loving guests. Remember, the goal is to make the drinking experience as enjoyable and seamless as possible!
Mastering Beer's Brew: The Art of Campden Tablet Timing
You may want to see also
![]()
Fridge Organization: Arrange taps in a way that maximizes airflow and prevents condensation
When organizing your beer fridge, the placement of taps is crucial for both aesthetics and functionality. Proper arrangement ensures optimal airflow, which is essential for maintaining the ideal temperature and preventing condensation. Here's a guide to help you achieve a well-organized and efficient beer fridge:
Strategic Placement of Taps: Start by visualizing the layout of your fridge. Beer taps should be positioned in a way that allows for adequate air circulation around each tap. A common practice is to place taps in a grid-like pattern, ensuring that there is enough space between them. This spacing prevents the taps from touching, which could lead to uneven cooling and potential condensation. Aim for a distance of at least 2-3 inches between taps to ensure proper airflow.
Consider the Fridge's Sides and Back: The sides and back of the fridge are prime locations for tap placement. These areas often have better air circulation compared to the top shelf. Place taps along the sides, ensuring they are not too close to the back wall, as this can restrict airflow. You can also consider placing taps on the top shelf, but make sure they are not directly above each other to avoid any potential issues with temperature distribution.
Utilize the Fridge's Corners: Corners are often overlooked but can be ideal spots for taps. These areas tend to have less airflow, so placing taps here can help balance the temperature. You can create a mini-cluster of taps in one corner, ensuring they are not too close to each other, allowing for better air circulation. This arrangement is especially useful if you have a larger collection and want to group similar beers together.
Prevent Condensation with Height: The height at which you mount the taps is vital to preventing condensation. Mounting taps too low can lead to cold surfaces, causing condensation on the fridge's interior. Aim to place the tap's center at around 4-6 inches above the fridge's interior. This height ensures that the beer remains cold and prevents any unwanted moisture buildup.
Regular Maintenance: Remember that proper fridge organization is an ongoing process. Regularly check the airflow around the taps and adjust their positions if needed. As your beer collection grows, you may find that certain taps require more attention to maintain optimal temperature. Stay vigilant and make adjustments to keep your beer fridge organized and efficient.
The Perfect Pairing: Lemon and Pacifico Beer
You may want to see also
![]()
Height Considerations: Place taps at a comfortable height for pouring and serving
When installing beer taps on a keezer, height is a critical factor that can significantly impact the user experience. The ideal placement of these taps ensures that pouring and serving beer is efficient and enjoyable. Here's a detailed guide on height considerations:
The height of the beer taps should be carefully determined to ensure a smooth and comfortable pouring process. For standard home bar setups, a good rule of thumb is to place the taps at a height that allows the bartender or server to stand comfortably while pouring. This height is typically around 36 to 40 inches from the floor. This range provides a natural and ergonomic position for the pourer, allowing them to control the flow of beer with ease. It's important to consider the reach and comfort of the person serving the beer, as they will be handling the taps frequently.
For home brewers, it's essential to take into account the height of the keezer itself. If the keezer is mounted at a higher level, the taps should be positioned accordingly. A higher keezer might require taps to be placed at a height of 42 to 48 inches or even higher, depending on the desired reach. This adjustment ensures that the beer can be poured without excessive stretching or awkward movements.
Additionally, the height of the taps can influence the beer's flow rate and temperature. Proper height placement allows for a smooth and consistent pour, ensuring that the beer is served at the optimal temperature. If the taps are too low, the beer may be poured too quickly, leading to a loss of carbonation and a less-than-ideal drinking experience. Conversely, taps that are too high might require more effort to operate, potentially causing fatigue during long serving periods.
In commercial settings, such as bars or restaurants, the height of beer taps is often standardized to ensure consistency and ease of use. These establishments typically follow industry guidelines to maintain a comfortable and efficient serving experience for both staff and customers.
By paying attention to these height considerations, you can create a well-designed keezer setup that enhances the overall beer-serving experience, making it both functional and aesthetically pleasing.
The Art of Rim Decor: Enhancing Your Pumpkin Beer Experience
You may want to see also
![]()
Lighting Impact: Ensure adequate lighting to showcase the beer and enhance the experience
The lighting in a beer-serving space, such as a keezer (a specialized beer cooler), is crucial for creating an inviting atmosphere and highlighting the beverages on offer. Adequate lighting not only showcases the beer but also significantly enhances the overall experience for customers. Here's a detailed guide on how to achieve this:
Highlight the Beer: Proper lighting is essential to draw attention to the beer itself. Consider the following techniques:
- Spotlighting: Use focused spotlights to illuminate the beer bottles or taps. This creates a spotlight effect, making the beer the center of attention. Place these lights at a slight angle to avoid glare and ensure the light reflects off the beer's surface, creating a captivating display.
- Backlighting: For a more subtle approach, backlight the keezer or the shelves where the beer is displayed. This technique adds depth and dimension to the beer, making it appear more vibrant and inviting. You can use LED strips or custom-made backlighting solutions to achieve this effect.
- Color-Changing Lights: Modern LED lighting systems allow for color-changing effects. Consider programming the lights to cycle through different colors, matching the beer's brand or theme. This dynamic lighting can create a fun and engaging atmosphere, especially during events or themed nights.
Enhance the Ambiance: Lighting also plays a vital role in setting the mood and overall ambiance:
- Warm Lighting: Opt for warm-toned lights to create a cozy and welcoming atmosphere. Warm lighting is less harsh and can make the space feel more intimate and comfortable. It encourages patrons to relax and enjoy their drinks.
- Dim Lighting for Intimacy: In certain areas, such as a designated smoking section or a quiet corner, consider using dimmer lights. This creates a more intimate setting, allowing customers to have a more relaxed and private experience.
- Strategic Placement: Pay attention to the placement of lights. Avoid direct overhead lighting, as it can create harsh shadows and make the space feel less inviting. Instead, use side lighting or indirect lighting to create a more natural and appealing environment.
Consider the Beer's Brand and Theme: Lighting can be used to reinforce the brand identity of the beer or the overall theme of your establishment. For instance:
- Brand-Specific Lighting: If you have a specific beer brand on tap, consider using lighting that aligns with their branding. This could mean using their signature color or incorporating their logo into the lighting design.
- Themed Lighting: For themed events or nights, adjust the lighting accordingly. For example, during a Halloween-themed night, use orange-hued lighting to create a spooky atmosphere. This attention to detail will make your keezer stand out and create a memorable experience.
Regular Maintenance: Ensure that the lighting system is well-maintained. Regularly check and replace any faulty lights or bulbs to avoid creating dark or unevenly lit areas. Consistent lighting quality is essential for providing a consistent and enjoyable experience for your customers.
By implementing these lighting strategies, you can transform your keezer into an eye-catching and inviting space, elevating the beer-drinking experience for your patrons. Remember, the right lighting can make a significant difference in how your beer is perceived and enjoyed.
Beyond the Glass: Creative Beer Pairing Ideas
You may want to see also
![]()
Accessibility: Strategically place taps for easy reach and efficient serving
When designing the placement of beer taps on a keezer, accessibility and efficiency are key considerations. The goal is to ensure that servers and customers can easily access the taps, promoting a smooth and enjoyable drinking experience. Here are some strategic placement guidelines:
Bar Area: Position the taps in a central location, easily accessible to servers and customers alike. A common setup is to place the taps on a bar counter, allowing servers to quickly grab a beer and serve it promptly. This central location also ensures that customers can easily reach the taps, especially if the bar has a self-service policy. Consider the height of the counter and ensure the taps are at a comfortable serving height to avoid strain on servers' arms.
Customer Visibility: Strategically place taps in areas where customers can easily see them. This encourages customers to explore the available beer options and make their choices. For example, in a busy restaurant or pub, placing taps near the entrance or in a prominent spot can attract attention and guide customers towards the beer selection. This visibility also reduces the time servers spend searching for the right beer, improving overall service efficiency.
Multiple Taps: If your keezer has multiple taps, distribute them evenly for optimal accessibility. Avoid clustering taps in one area, as this can create congestion and make serving less efficient. Instead, space them out, allowing servers to move freely between taps. This distribution also ensures that customers can easily access different beer options without feeling cramped or crowded.
Height and Reach: Consider the height of the keezer and the average reach of servers and customers. Taps should be positioned at a comfortable height to prevent strain and promote efficient serving. For servers, a height that allows them to grab a beer with minimal bending or stretching is ideal. For customers, ensure the taps are not too high, as this may require them to stretch or lean, potentially causing discomfort.
Accessibility for All: Ensure that the tap placement is accessible to all customers, including those with physical disabilities. Avoid placing taps in areas that may be difficult to reach, such as behind obstacles or in tight spaces. Consider the use of adjustable tap handles or levers to accommodate different heights and abilities. By making the taps easily accessible to everyone, you create an inclusive environment and enhance the overall customer experience.
Beer Cap Table: A Guide to Decorating with Caps
You may want to see also
Frequently asked questions
The ideal placement for beer taps on a keezer is at a slight angle, approximately 45 degrees, to the side of the tap handle. This positioning allows for a smooth flow of beer and prevents airlock, ensuring a consistent pour. It also makes it easier for drinkers to access the taps without spilling.
Yes, placing the taps too close to the bottom can lead to issues. When the beer is poured, it might create a strong, direct stream, which can result in a faster-than-desired pour and potential spillage. It's best to position the taps a little higher, allowing for a more controlled and steady flow.
The number of taps per side can vary depending on personal preference and the size of your keezer. Typically, a standard keezer has two taps per side, but you can opt for more if you have a larger selection of beers. Just ensure that the keezer is not overloaded, as this can affect the beer's temperature and overall experience.
Adjusting the tap positions is a simple process. You can loosen the screws or nuts that hold the tap handles in place and gently rotate them to change the angle. Moving the taps slightly further apart or closer together can also impact the flow rate. Experiment with small adjustments to find the perfect position for your desired beer flow.