If you're an avid beer enthusiast looking to elevate your drinking experience, consider trying a beer snorkel. This innovative device allows you to enjoy your favorite brews with a unique twist. In this guide, we'll walk you through the process of putting together your very own beer snorkel, ensuring you have all the necessary components and a step-by-step approach to assembly. Whether you're a seasoned DIYer or new to crafting, this guide will provide the insights you need to create a personalized beer snorkel that suits your taste and style.
What You'll Learn
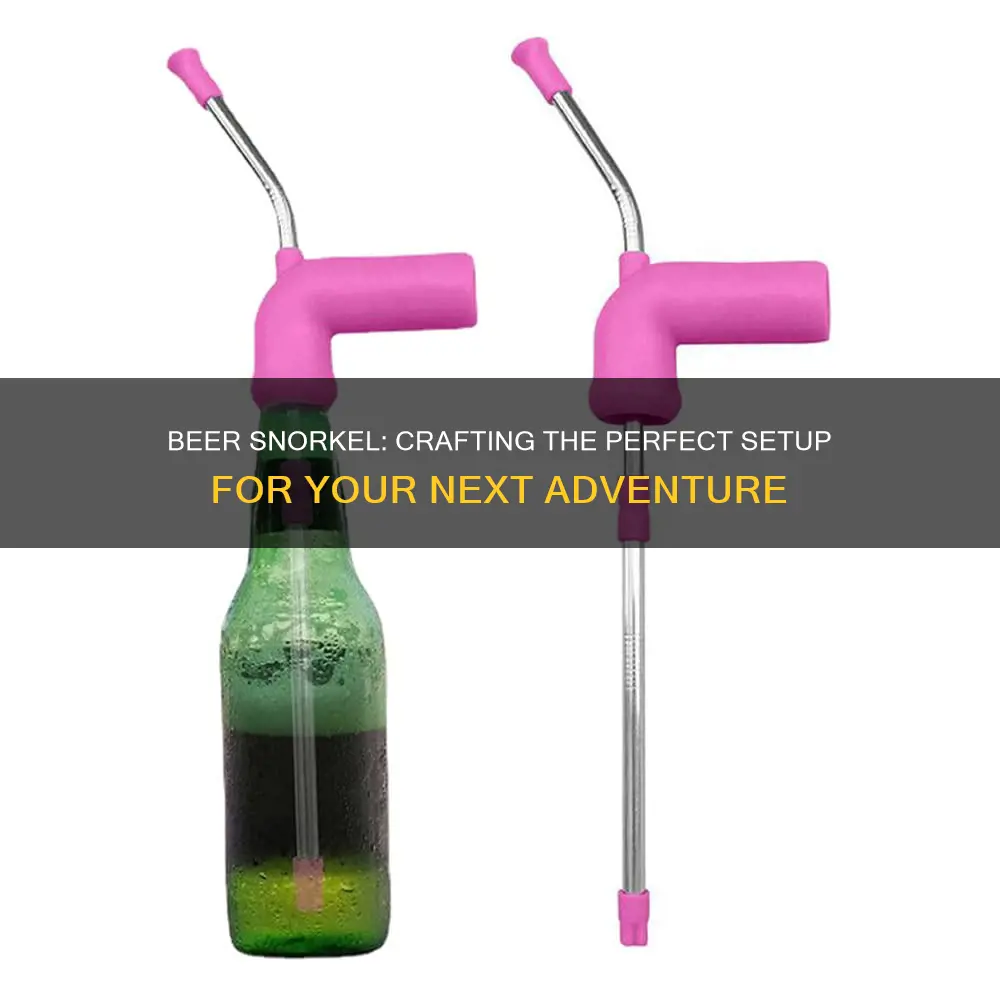
- Gather Materials: Collect beer bottle, snorkel tube, bite valve, and hose
- Attach Hose: Secure hose to bottle with clamp, ensuring a tight fit
- Connect Bite Valve: Attach bite valve to hose, allowing controlled airflow
- Test for Leaks: Inspect connections for any leaks before use
- Practice Breathing: Experiment with different breathing techniques to optimize performance
![]()
Gather Materials: Collect beer bottle, snorkel tube, bite valve, and hose
To create a unique and fun drinking experience, you can assemble a beer snorkel, which is essentially a modified snorkel used for breathing underwater, adapted for drinking from a bottle. Here's a step-by-step guide on gathering the necessary materials:
Start by collecting a beer bottle, preferably one with a wide mouth to accommodate the snorkel. Ensure it is clean and dry before proceeding. Next, you'll need a snorkel tube, which is the main component that will allow you to reach into the bottle. A standard snorkel tube is typically made of flexible plastic and is curved to fit comfortably in your mouth. Look for a length that suits your height and comfort; longer tubes might be preferable for taller individuals.
In addition to the snorkel tube, you'll require a bite valve, a crucial part that seals the end of the tube and allows you to control the flow of liquid. Bite valves are often made of soft, flexible material and are designed to be bite-resistant, ensuring a secure seal when you take a sip. These valves also prevent spillage and provide a convenient way to drink without removing the snorkel from your mouth.
Lastly, you'll need a hose, which will be used to connect the snorkel tube to the beer bottle. The hose should be long enough to reach from the bottle to the bite valve, ensuring a comfortable drinking position. Opt for a flexible hose that can bend and twist easily without kinking.
By gathering these materials, you'll have the foundation for your beer snorkel assembly. Remember to choose high-quality, durable materials to ensure a safe and enjoyable drinking experience.
Unveiling the Mystery: Formaldehyde in Beer - Fact or Fiction?
You may want to see also
![]()
Attach Hose: Secure hose to bottle with clamp, ensuring a tight fit
To begin constructing your beer snorkel, you'll need to attach the hose to the bottle. This process ensures that the liquid flows from the bottle into the snorkel and out into your glass. Start by locating the hose connection on your bottle. It's typically a small opening at the base of the bottle, designed to fit the hose snugly. Take your hose and align it with this opening, ensuring it's positioned correctly.
Now, it's time to secure the hose. You'll need a clamp to create a tight seal. Choose a clamp that is the right size for your hose and bottle opening. The clamp should be able to grip the hose firmly without damaging it. Slide the clamp onto the hose, positioning it so that the hose is sandwiched between the clamp and the bottle opening.
To ensure a tight fit, you may need to adjust the clamp. Tighten it gently by turning the screw or adjusting the mechanism, depending on the type of clamp you have. You want to create enough pressure to hold the hose in place without causing any damage or leaks. Test the fit by gently pulling on the hose; it should feel secure and not move.
If you're using a more complex system with multiple parts, you might have a specialized hose connector. In this case, you'll attach the hose to the connector, which then connects to the bottle. Follow the manufacturer's instructions for this step, as the process may vary. Ensure that all connections are tight and secure to prevent any spills.
Remember, the key to a successful beer snorkel is a secure attachment. Take your time to ensure the hose is properly aligned and clamped, creating a tight seal. This will guarantee a smooth flow of your favorite beverage from the bottle to your glass.
Unveiling the Mystery: Why Salt on Napkins Under Beer
You may want to see also
![]()
Connect Bite Valve: Attach bite valve to hose, allowing controlled airflow
To connect the bite valve to the hose, you'll need to ensure a secure and controlled airflow mechanism. Start by aligning the bite valve's inlet with the hose's outlet, ensuring a precise match. The bite valve is a crucial component that allows you to control the airflow when you take a sip. It should be designed with a flexible, yet sturdy, material that can withstand the pressure of your breath.
Gently push the bite valve onto the hose, ensuring it is firmly attached. You might need to use your fingers to create a tight seal, especially if the hose has a unique diameter. The goal is to create a seamless connection that prevents any air leakage. Once attached, the bite valve should feel secure and stable, providing a reliable seal.
Consider the orientation of the bite valve. It should be positioned in a way that is comfortable for your mouth and allows for easy breathing. You might want to experiment with different angles to find the most suitable position. A well-connected bite valve will enable you to take sips without any air rushing into your drink, ensuring a smooth and uninterrupted flow.
When attaching the bite valve, be mindful of the hose's flexibility. The hose should be able to move slightly to accommodate your mouth's position without compromising the seal. If the hose is too stiff, it might restrict your breathing, making the drinking experience less enjoyable. A good connection should allow for a natural, fluid motion when you take a sip.
Remember, the bite valve is a critical part of your beer snorkel, as it controls the airflow and ensures a positive drinking experience. Take your time to attach it properly, and don't be afraid to adjust the position until you find the most comfortable and functional setup. This attention to detail will make your beer-drinking adventure more enjoyable and efficient.
The Ultimate Guide to Beer and Corned Beef: A Match Made in Heaven?
You may want to see also
![]()
Test for Leaks: Inspect connections for any leaks before use
Before you can enjoy your beer with a snorkel, it's crucial to ensure that all connections are secure and leak-free. This step is essential to prevent any unwanted spills or drips, especially when you're out and about. Here's a detailed guide on how to test for leaks and inspect the connections:
Start by gathering all the components of your beer snorkel, including the main tube, the drinking straw, the beer container, and any additional parts like a filter or a cap. Lay them out on a clean, flat surface to facilitate the inspection process. Look for any signs of damage or wear and tear on the connections. Check for cracks, especially around the joints where the different parts meet. Even a small crack can lead to leaks, so be thorough in your examination.
Next, inspect the connections for tightness. Ensure that each part is firmly attached to the next. You can use your fingers to gently press and twist the connections to feel for any play or looseness. If you find any loose parts, tighten them securely. It's important to note that over-tightening can also cause damage, so use your discretion and common sense. A good rule of thumb is to ensure that the connections are snug but not overly forced.
Now, it's time to test for leaks. You can do this by submerging the snorkel in water. Fill the beer container with water and then carefully place the snorkel into the water, ensuring that the drinking straw is fully submerged. Hold the container in one hand and gently rock it back and forth to simulate movement. Observe the snorkel for any signs of water seeping through the connections. If you notice any leaks, identify the specific connection that is causing the issue and tighten or adjust it accordingly.
Additionally, you can use a simple visual inspection to check for leaks. After submerging the snorkel, look for any bubbles forming around the connections. Bubbles indicate that there is air present, which could be a sign of a leak or an improperly sealed connection. If you see bubbles, carefully remove the snorkel and inspect the connections again, making any necessary adjustments.
Remember, taking the time to thoroughly inspect and test for leaks will ensure a pleasant and spill-free experience when using your beer snorkel. It's a simple yet crucial step to guarantee that your beer remains where it should be—in your glass!
Chili Con Beer: A Tasty Twist or a Recipe Disaster?
You may want to see also
![]()
Practice Breathing: Experiment with different breathing techniques to optimize performance
Breathing techniques are an essential aspect of mastering the art of beer snorkeling, and practicing different methods can significantly enhance your performance. Here's a guide on how to experiment with breathing techniques to optimize your beer-snorkeling experience:
Diaphragmatic Breathing: This technique involves breathing deeply into your diaphragm, engaging your belly muscles. Start by finding a comfortable position, either sitting or lying down. Place one hand on your belly and the other on your chest. Inhale slowly through your nose, feeling your belly rise as you fill your lungs with air. Then, exhale slowly through your mouth, engaging your diaphragm to push air out. Focus on using your belly muscles to control the breath, ensuring that your chest movement is minimal. Practice this technique to increase lung capacity and improve oxygen intake, allowing you to hold your breath for longer durations.
Breath Control: Experiment with breath-holding exercises to build endurance. Start with short breath-holding sessions, gradually increasing the duration. Inhale deeply, then exhale slowly to empty your lungs. Hold your breath for a set period, aiming to beat your previous record. Focus on relaxing your body and mind during breath-holding. Practice this regularly to train your body to conserve oxygen and improve your overall breath control.
Breath Awareness: Pay close attention to your breathing patterns throughout the day. Notice how you breathe when you're relaxed, anxious, or active. Experiment with slowing down your breath rate and deepening each inhalation and exhalation. This practice helps you become more aware of your breathing patterns and can be applied during snorkeling. By regulating your breath, you can maintain a steady and calm state, which is crucial for successful beer snorkeling.
Breath Retention and Exhalation: Try breath-retention exercises to improve your ability to hold your breath and control the air in your lungs. Inhale deeply, then hold your breath for a few seconds. Exhale slowly, focusing on the sensation of air leaving your lungs. Practice this technique to train your body to retain breath and manage air flow. This skill is particularly useful when you need to maintain a steady breath during the snorkeling process.
Remember, practicing breathing techniques is a continuous process, and consistency is key. Dedicate regular time to experiment with these methods, and you'll soon notice improvements in your beer-snorkeling performance.
Spoonful of Fizz: The Beer Bubble Mystery
You may want to see also
Frequently asked questions
You'll need a long, flexible drinking straw, a small piece of rubber or silicone (to create a seal), and a small container to hold the beer. You might also want to use a small piece of wire or a twist tie to secure the straw.
Start by cutting the straw to the desired length, leaving a few extra inches at the bottom. Then, insert the straw into the container, ensuring it's centered. You can use the rubber or silicone to create a tight seal around the straw's opening, preventing any beer from spilling.
For an airtight seal, you can use a small amount of hot glue or a drop of silicone sealant around the straw's base. Alternatively, you can twist the straw into a coil or a spiral shape and secure it in place with a small piece of wire or a twist tie.
Absolutely! You can extend the length of the snorkel by adding more straw sections. Simply cut additional straw pieces and attach them end-to-end using the sealing method of your choice. This allows you to reach further distances or create a more dramatic effect.
To avoid spills, ensure that the straw is securely sealed in the container. You can practice taking sips while holding the container at an angle to simulate different drinking positions. Additionally, consider using a larger container with a wider opening to accommodate the straw and provide more stability.