Putting a stem on a beer bottle is a simple process that can enhance the drinking experience. A stem, also known as a bottle cap or beer bottle opener, is a small metal piece that fits over the bottle's opening, allowing you to pour the beer without removing the bottle cap. This method is particularly useful for preserving the beer's freshness and carbonation. Here's a step-by-step guide on how to attach a stem to your beer bottle:
What You'll Learn
![]()
Gather Materials: Collect a stem, bottle, and adhesive
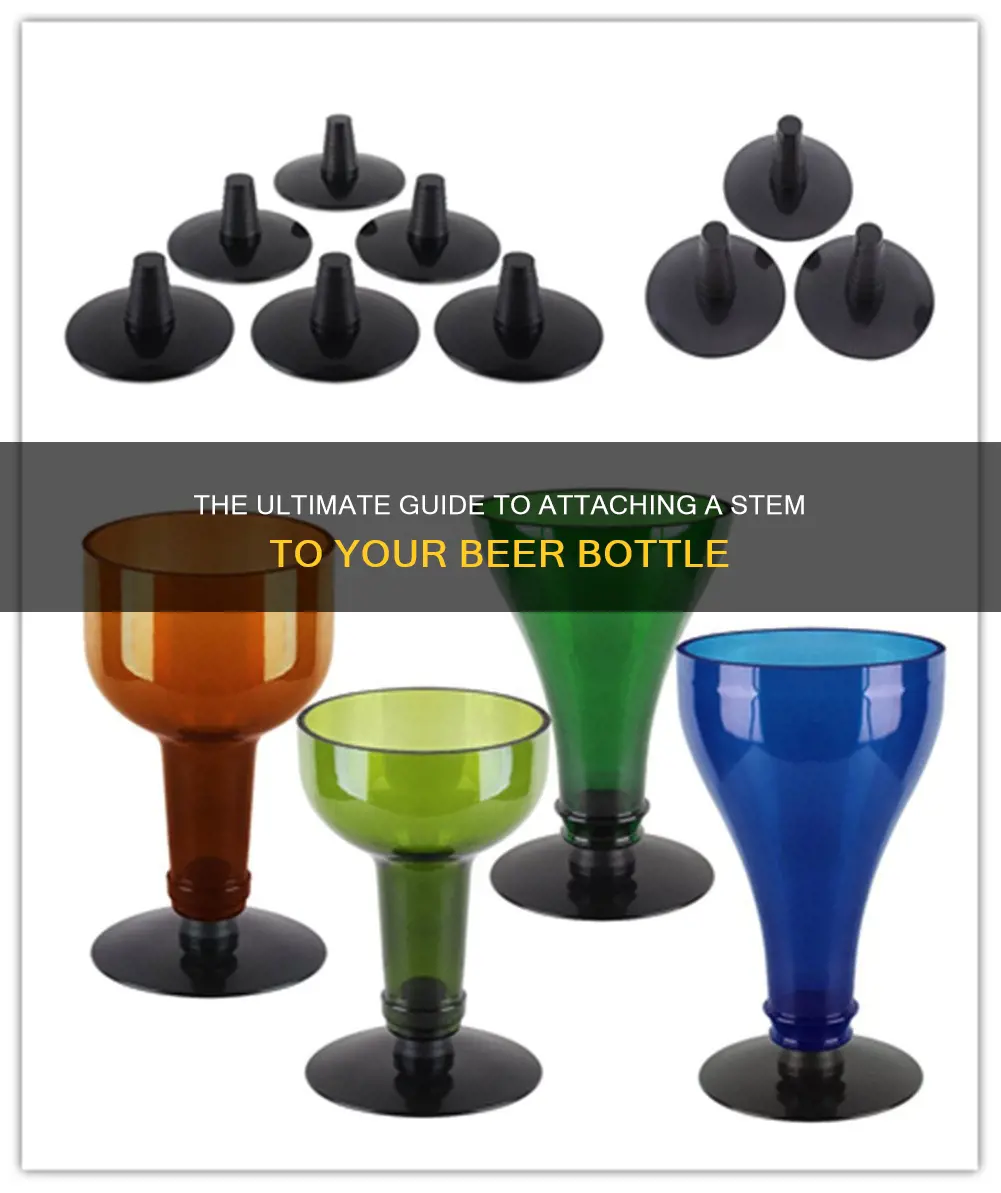
To begin the process of adding a stem to your beer bottle, the first step is to gather the necessary materials. You will need a few key components to ensure a successful and secure attachment. Firstly, you'll require a bottle stem, which is essentially a long, slender piece of metal or plastic that fits into the opening of the bottle. These stems are typically available in various sizes and materials, so choose one that matches your bottle's diameter. Ensure it is long enough to extend above the bottle's rim for easy grip and handling.
In addition to the stem, you'll need a suitable bottle. This could be a glass beer bottle or any other type of container with a similar shape and size. Inspect the bottle to ensure it is clean and free of any debris or contaminants. The bottle should be in good condition, with no cracks or damage that could compromise the integrity of the attachment.
Lastly, you'll require an adhesive to secure the stem in place. This can be a specialized beer bottle stem adhesive or a strong, flexible epoxy that is designed for bonding glass and metal. Choose an adhesive that is appropriate for the materials you are working with and follow the manufacturer's instructions for application. It is crucial to use the right adhesive to ensure a strong and durable bond.
When gathering these materials, it is essential to source them from reliable suppliers or stores. Check local hardware or home improvement stores for the necessary components, or consider online retailers that specialize in beer-making supplies. Ensure you have all the required items before proceeding to the next steps of the project.
Crafting the Perfect Beer Garden: A Microbrewery's Guide
You may want to see also
![]()
Clean the Bottle: Ensure the bottle is dry and free of residue
To begin the process of adding a stem to your beer bottle, it's crucial to start with a clean and dry bottle. This initial step is often overlooked but is essential for a successful and secure attachment. Here's a detailed guide on how to ensure your bottle is ready for the stem:
Step 1: Rinse the Bottle
Start by rinsing the bottle with warm water. This initial cleaning step helps remove any loose dirt or debris that might be present on the bottle's surface. Use a mild detergent or dish soap if you notice any stubborn stains or residue. Ensure you rinse thoroughly to avoid any soap residue, as this can interfere with the bonding process.
Step 2: Dry Thoroughly
After rinsing, it's imperative to dry the bottle completely. Moisture on the bottle's surface can prevent the stem from adhering properly. Use a clean, lint-free cloth or paper towel to wipe down the entire bottle, including the neck and threads. Make sure there are no water spots or streaks left behind, as these can compromise the stem's grip.
Step 3: Inspect for Residue
Take a close look at the bottle's interior and exterior. Check for any remaining residue or spots that might have been missed during the drying process. You can use a magnifying glass to ensure you don't overlook any small areas. If you find any residue, gently wipe it away with a clean cloth.
Step 4: Verify Dryness
Before proceeding, verify that the bottle is entirely dry. You can do this by gently touching the surface with your finger. If it feels warm or slightly damp, it's best to wait a few minutes for it to air dry completely. Ensuring the bottle is dry will prevent any unwanted sticking or residue buildup when you apply the stem.
By following these steps, you'll create a clean and prepared bottle, setting the foundation for a successful stem attachment. This process ensures a secure and long-lasting fit, allowing you to enjoy your beer with the added convenience of a stem. Remember, taking the time to clean and dry the bottle is a crucial part of the process.
The Perfect Way to Add a Splash of Lime to Your Beer
You may want to see also
![]()
Attach the Stem: Secure the stem with a strong adhesive
When it comes to adding a stem to your beer bottle, ensuring a secure and long-lasting attachment is crucial. Here's a step-by-step guide on how to achieve this:
Start by cleaning the bottle and stem thoroughly. Any dirt or residue on the bottle's surface can compromise the adhesion process. Use a mild detergent and warm water to create a soapy solution, and gently scrub the bottle's neck and the stem's base. Ensure you rinse the bottle thoroughly to remove any soap residue. This preparation step is essential for a strong bond.
Next, apply a generous amount of a high-quality adhesive specifically designed for glass and plastic. You can use a strong epoxy or a two-part adhesive system. Follow the manufacturer's instructions for application, as different adhesives may have varying requirements. Typically, you'll want to ensure an even coat around the stem's base, covering a good portion of the stem's surface. Allow the adhesive to sit for a few minutes to become tacky.
Now, carefully place the stem onto the bottle's neck, aligning it with the center of the bottle's opening. Apply firm pressure to the stem, holding it in place for a specified amount of time, usually around 10-15 minutes, depending on the adhesive used. This pressure ensures optimal contact and allows the adhesive to set properly. Avoid any sudden movements or vibrations that might cause the stem to shift during this critical bonding phase.
After the specified time has passed, gently remove the stem and check the bond. If the adhesive feels firm and the stem doesn't move, you've successfully secured it. If not, you may need to reapply the adhesive and repeat the process, ensuring you follow the manufacturer's guidelines for multiple applications. Remember, the key to a successful attachment is patience and precision.
By following these steps and using a strong adhesive, you can create a sturdy and long-lasting stem attachment for your beer bottle, enhancing its functionality and overall appeal.
The Ideal Height for Your Beer Tap: A Guide to Pouring Perfection
You may want to see also
![]()
Test for Leaks: Invert the bottle to check for any leaks
When preparing to add a stem to your beer bottle, it's crucial to ensure that the bottle is leak-free. One simple and effective method to test for leaks is by inverting the bottle. This process is straightforward and can be done at home without any specialized tools. Here's a detailed guide on how to do it:
Start by filling the bottle with water, ensuring that you fill it to the very top. This step is important because it allows you to create a pressure differential that will help detect any potential leaks. Make sure the water is at room temperature to avoid any issues with expansion or contraction. Once the bottle is full, seal it tightly by screwing the cap on firmly.
Now, carefully invert the bottle. Place it upside down, ensuring that the water-filled bottle is in a stable position. This step requires precision to avoid any spills. Observe the bottle for any signs of water leaking from the threads where the cap meets the bottle. Even a small amount of leakage can be noticeable due to the pressure created by the inverted position.
If you notice any leaks, it indicates that the bottle's threads or the cap might not be sealed properly. In such cases, you may need to clean the threads and ensure a tight screw-on action. You can use a small amount of dish soap and warm water to clean the threads, then thoroughly dry them before reassembling. Re-test the bottle after cleaning to ensure the leak is resolved.
This simple test is a quick way to identify potential issues before finalizing the stem attachment. It's an essential step to guarantee that your beer bottle is leak-proof, ensuring a smooth and enjoyable drinking experience. Remember, a well-sealed bottle will contribute to the overall quality of your beer, so take the time to get it right.
The Salty Truth: Why Beer Lovers Add Salt
You may want to see also
![]()
Enjoy Your Beer: Celebrate with a cold, refreshing drink
The art of enjoying a cold, refreshing beer is a delightful experience, and having the right tools can elevate this simple pleasure. One such tool that can enhance your beer-drinking journey is a beer stem, a specialized glassware designed to showcase the beauty of your beverage and provide an elegant drinking experience. Here's a guide on how to put a stem on a beer bottle and celebrate your love for the golden elixir.
First, gather the necessary materials. You'll need a beer bottle, preferably one with a narrow neck to accommodate the stem, and a beer stem of your preferred style and material. Stems come in various designs, from simple and sleek to intricately patterned, allowing you to choose one that complements your taste and the occasion. Ensure the stem is made of a durable material like glass or crystal, as this will determine the overall quality of your drinking experience.
Now, it's time to attach the stem to your bottle. Start by carefully cleaning the bottle's neck to remove any dirt or residue. This step is crucial to ensure a secure attachment. Next, align the stem with the bottle's opening, ensuring it fits snugly. You might need to adjust the stem's position slightly to get the perfect fit. Once aligned, secure the stem by gently pressing it onto the bottle. Hold it firmly for a few seconds to allow the stem to settle into place.
After successfully attaching the stem, it's time to celebrate! Pour your favorite beer into the stem, and watch as the liquid shimmers in the elegant glassware. The stem not only adds a touch of sophistication but also helps retain the beer's carbonation, keeping it crisp and refreshing. Enjoy the unique drinking experience, feeling the coolness of the beer against your lips as you savor each sip.
Remember, the process of adding a stem to your beer bottle is a simple yet impactful way to enhance your beer-drinking ritual. It transforms a basic beverage into a special occasion, making every sip a celebration. So, gather your friends, pour a cold one, and raise your stems as you toast to the joy of sharing a refreshing beer.
The Beirut Beer Experience: Pouring Fun into Cups
You may want to see also
Frequently asked questions
Attaching a stem to a beer bottle is a simple process. First, ensure the bottle is clean and dry. Then, align the stem with the bottle's opening, pushing it down until it fits snugly. You can use a small amount of beer bottle wax or a thin layer of hot glue around the stem's base for extra security.
While it's possible to reuse an old bottle cap, it's not recommended for optimal beer-drinking experience. Bottle caps are designed for sealing and may not provide the same level of stability and insulation as a dedicated stem. Consider investing in a new stem for the best results.
A stem offers several advantages. It provides a more elegant and secure way to hold the bottle, preventing accidental spills. Stems also help maintain the beer's temperature, keeping it cool and fresh. Additionally, they can enhance the overall drinking experience by providing a comfortable grip.
Yes, there are various types of stems, including screw-on, push-fit, and twist-lock designs. Each type has its own advantages. For example, screw-on stems offer a secure fit, while push-fit stems are easy to attach and remove. Choose a stem that suits your preferences and the type of beer bottle you have.